


Most Amazon sellers don’t build a full funnel. They build a bottom funnel — usually a handful of Sponsored Products campaigns pointed at their best keywords — and call it a strategy. Then, when growth flatlines, they bolt on Sponsored Brands or a retargeting campaign as an afterthought, without any logic connecting the pieces.
The result is predictable: a fractured set of campaigns that compete with each other for budget, report conflicting metrics, and produce a TACoS that creeps higher even as individual campaign ACoS looks deceptively healthy.
A true full-funnel Amazon advertising approach is fundamentally different — not because it uses more ad formats, but because it uses them in a deliberate sequence, with each stage built on the data and infrastructure of the stage before it. Critically, that sequence matters more than the formats themselves. Launching Sponsored Brands before you have conversion data is expensive. Running DSP before your bottom funnel is stable is expensive in a different way — you’re building awareness for a product that isn’t ready to catch the demand.
This post is a structured 30-day implementation plan — not a general overview of what full-funnel advertising could look like, but a specific, week-by-week build sequence grounded in how Amazon’s ad auction, attribution window, and algorithm actually behave in a new product’s critical early days. The goal isn’t to be running every ad type by day 30. The goal is to be running the right ad types, in the right order, with the data to prove what’s working.
What “Full Funnel” Actually Means on Amazon (and What It Doesn’t)
The phrase “full funnel” has become marketing shorthand for “spend more across more formats.” That’s not what it means in practice, and misunderstanding it is one of the fastest ways to waste a launch budget.
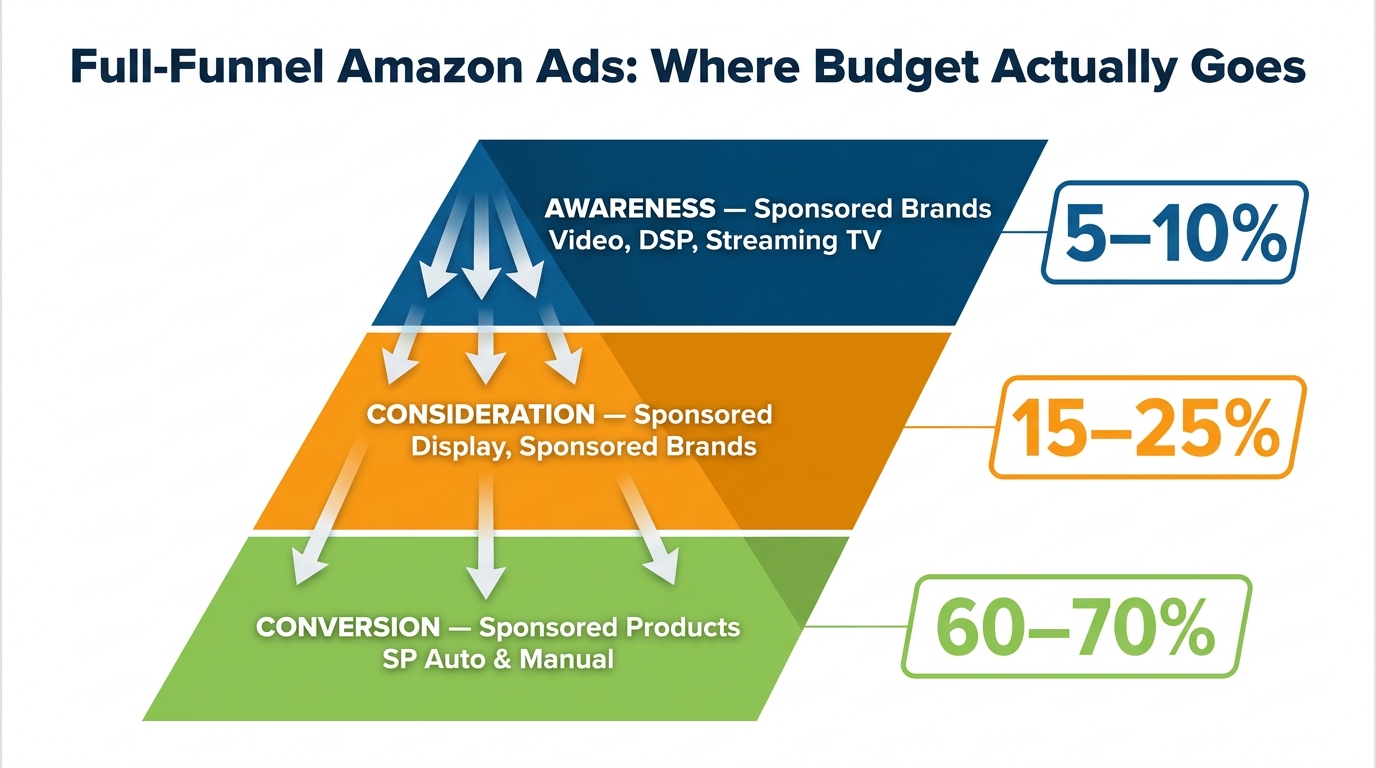
On Amazon, a full funnel maps to three distinct stages with distinct ad formats, audience signals, and success metrics for each:
Top of Funnel: Awareness
Top-of-funnel advertising on Amazon is about reaching shoppers who don’t yet know your product exists. The formats that operate here are Amazon DSP (programmatic display and video), Streaming TV ads via Prime Video, and audio ads. These formats work outside the search bar — they intercept potential buyers while they’re streaming, browsing, or even off Amazon entirely. Success here isn’t measured in ROAS or ACoS. It’s measured in new-to-brand reach, branded search lift, and share of voice in your category over time.
Middle of Funnel: Consideration
Mid-funnel advertising engages shoppers who are actively searching for a solution but haven’t committed to a brand. Sponsored Brands (static and video), Sponsored Display (audience-based), and Sponsored Display retargeting live here. These formats appear in search results and on product detail pages, reaching shoppers who are comparing options. Success metrics shift to click-through rate, detail page view rate, and branded search volume.
Bottom of Funnel: Conversion
This is where Sponsored Products — auto and manual — operate. Shoppers here have high purchase intent. They’re searching specific product keywords or browsing category pages ready to buy. ACoS and conversion rate are the primary metrics. This is also where Amazon’s search rank algorithm is most directly influenced by your ad-driven sales velocity.
What “full funnel” does not mean is running all three simultaneously from day one. In fact, for most brands in the first 30 days, doing so actively hurts performance. Upper and mid-funnel formats need bottom-funnel conversion data to feed their audiences. Without it, you’re paying to build awareness for a product that has no proven ability to convert when shoppers arrive. The sequence of activation is the strategy.
Before Day 1 — Retail Readiness as Your Real Foundation
If there is one rule that summarizes everything about first-30-day Amazon advertising, it’s this: ads amplify what’s already there. If your listing converts, ads will accelerate that conversion. If your listing has problems, ads will accelerate the spending without the sales.
Retail readiness isn’t a soft checklist — it has direct, measurable consequences for ad performance. Amazon’s algorithm uses conversion rate as one of its core ranking signals. When you run ads on a listing with a poor conversion rate, you’re paying for clicks that don’t convert, which tells Amazon’s algorithm that your product isn’t relevant for those search terms, which lowers your organic ranking. You’ve spent money to make your organic position worse.
The Six Retail Readiness Criteria
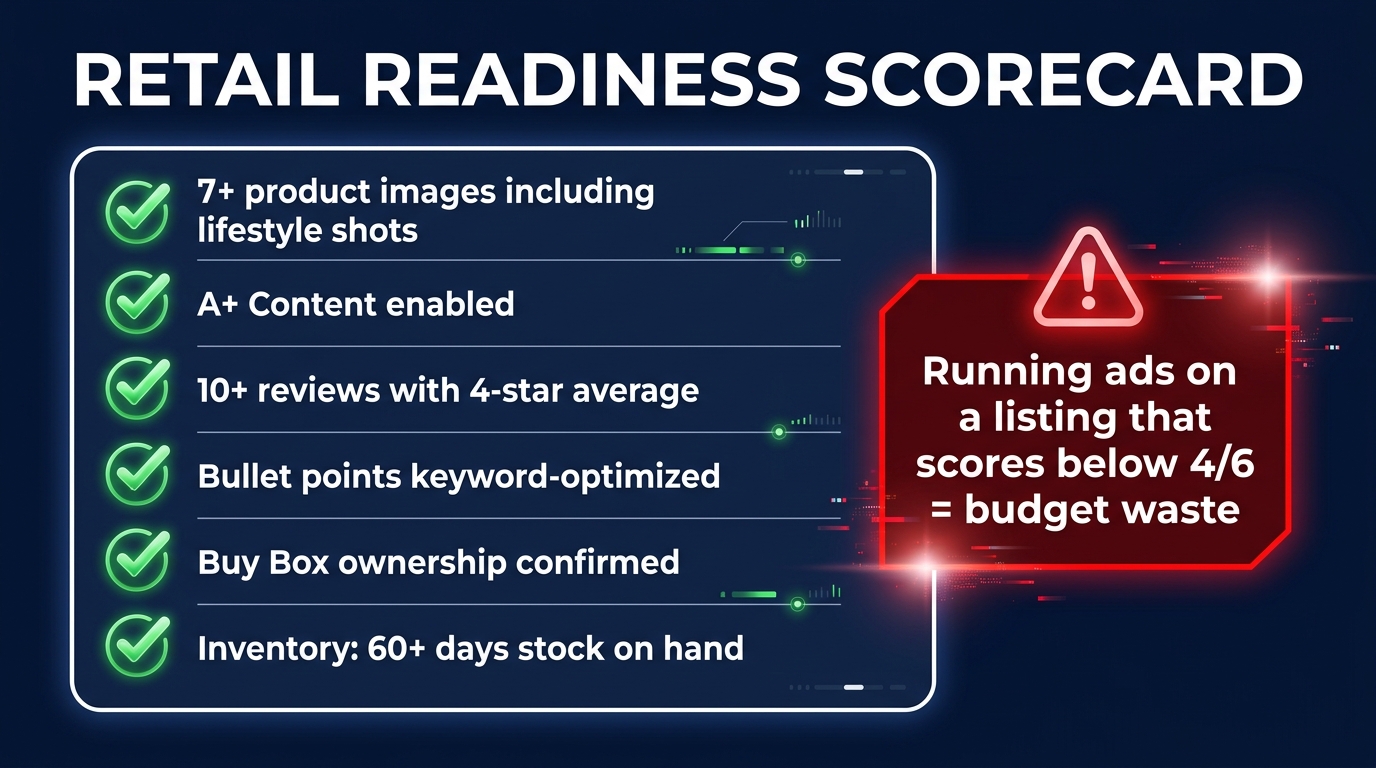
Before launching a single campaign, verify all six of the following:
- Images: Minimum 7 images including at least one lifestyle shot, one infographic, and one size/scale reference. Amazon’s algorithm and shoppers alike use images as a primary quality signal. Listings with 7+ high-quality images have measurably higher conversion rates than those with 3–4 stock photos.
- A+ Content: This is the enhanced product description below the fold. A+ Content is free for brand-registered sellers and consistently improves conversion rates. Multiple Amazon studies show A+ Content lifts conversion by 3–10% on average. There’s no reason to launch ads without it.
- Reviews: Ideally 10+ reviews with a 4.0+ star rating before launch advertising at scale. Sub-10 reviews doesn’t make ads impossible, but it does depress conversion rates significantly. If you’re launching a new ASIN with zero reviews, your first days of ads will be expensive by design — factor that into your expectations.
- Bullet points and title: Your primary keywords must appear naturally in the title and the first two bullet points. This isn’t just an SEO exercise — it directly affects whether Amazon’s auto campaigns find and bid on the right search terms for your product.
- Buy Box ownership: You must own the Featured Offer (Buy Box) for your ads to run effectively. If you’re a third-party seller in a competitive ASIN, confirm you hold the Buy Box before spending on ads — otherwise your campaigns may generate clicks that complete on a competitor’s listing.
- Inventory depth: At least 60 days of inventory on hand before scaling ads. Running out of stock during a launch campaign doesn’t just pause your sales — it destroys the ranking momentum you’ve spent money to build. Amazon’s algorithm registers the out-of-stock as a relevance signal and redistributes your organic position to competitors.
The Pre-Launch Keyword Audit
Before day one, complete a keyword research session using Helium 10, Jungle Scout, or Amazon’s own Brand Analytics (if you have access). Identify three tiers of keywords: five to ten high-volume head terms that define your category, fifteen to twenty mid-volume modifier terms (color, size, use case, material), and a long tail of fifty or more specific queries. This three-tier structure will directly shape how you build your campaigns in the first two weeks.
Days 1–7 — Bottom-Funnel First: The Sponsored Products Discovery Phase
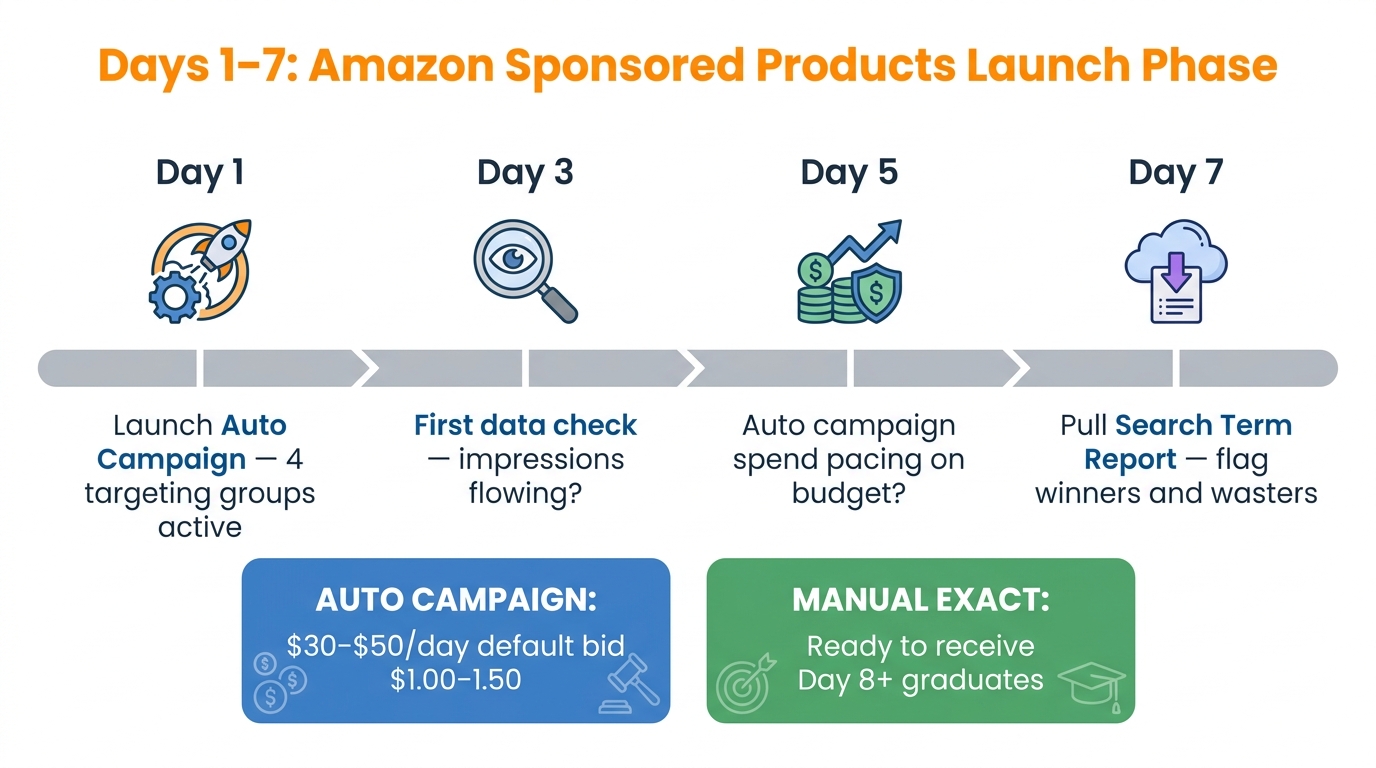
Days one through seven have a single objective: generate conversion data and accumulate search term intelligence. Profitability is not the goal. Ranking data and keyword signal are.
Amazon’s algorithm weighs recent sales velocity heavily in organic ranking decisions — particularly in the first 30 to 60 days of a new ASIN, which many practitioners refer to as the “honeymoon period.” During this window, Amazon is actively testing your product against competing ASINs to determine where it belongs in organic results. Your ad spend during this period doesn’t just generate sales — it sends ranking signals that can persist for months.
Campaign Structure for Days 1–7
Launch two campaign types simultaneously on day one, held in separate campaigns with separate budgets:
Campaign 1 — Auto Campaign (Discovery Engine)
Set your daily budget at $30–$50 minimum, with a default bid of $1.00–$1.50 depending on your category’s average CPC. Amazon’s auto campaign has four built-in targeting groups — close match, loose match, substitutes, and complements — and each is essentially a different strategic bet. Close match targets keywords tightly related to your product listing. Loose match casts a wider net. Substitutes targets shoppers browsing similar products. Complements targets product pages that pair naturally with yours.
On day one, set bids across all four groups at your default starting bid. You can separate these groups later, but in week one, the goal is data collection across all four audience types. Don’t adjust bids in the first 72 hours — you need at least two to three days of impression and click data before any adjustment is meaningful.
Campaign 2 — Manual Exact Match (Control Set)
Take your five to ten highest-priority head terms from your pre-launch keyword research and load them into a manual exact match campaign. This campaign isn’t a discovery tool — it’s a controlled test to understand conversion performance on your most important search terms. Bid aggressively here: if your category’s average CPC is $1.50, bid $1.75–$2.00 to secure prominent placement during the critical early ranking window.
Keep these two campaigns completely separate. Never mix match types in the same campaign — it makes budget allocation opaque and optimization nearly impossible.
Day 3 and Day 5 Checks
By day three, you should have enough impression and click data to verify that your targeting is working. Specifically, check that your auto campaign is accumulating impressions (at least 1,000+ per day for most categories) and that your click-through rate is above 0.3%. If impressions are very low, your listing relevance signals may be too weak — review your title and bullet points against the category search terms.
By day five, check your pacing. If either campaign is hitting its daily budget cap before the end of the day, your budget is too low for the keyword competition in your category. Increase budget by 25–30% and monitor for another 48 hours. Running out of budget midday means you’re losing the afternoon and evening shopping windows, which are often the highest-conversion periods.
Day 7 — The First Search Term Report Pull
On day seven, download your Search Term Report from Campaign Manager. This report shows you the exact queries shoppers typed before clicking your ads — not the keywords you targeted, but the actual customer language. Spend time here. Look for three types of entries:
- Winners: Search terms with 2+ orders and an ACoS below your target. These graduate to a manual exact match campaign in week two.
- Wasters: Search terms with 5+ clicks and zero orders. These become negative exact match keywords in your auto campaign immediately — they’re burning budget with no return.
- Promising terms: Search terms with 1 order and a reasonable click count. Flag these for the next report pull in week two before deciding.
Do not skip the negative keyword step. Adding negatives to your auto campaign is one of the highest-ROI actions you can take in the entire 30 days. Every dollar you redirect away from irrelevant queries is a dollar available for queries that actually convert.
Days 8–14 — Search Term Harvesting and Your First Manual Campaigns
Week two is where the data from week one starts doing real work. The process is called search term harvesting, and it’s the core discipline of Sponsored Products management: move what’s converting into manual campaigns where you have precise bid control, and aggressively cut what isn’t converting in the auto campaign.
Building Your Manual Campaign Structure
Take the winner terms from your day-seven Search Term Report and add them to a new or existing manual exact match campaign. These aren’t just campaign entries — they’re your organic ranking targets. Every exact match keyword you prove converts via ads is a keyword where increased sales velocity can push your organic position up the search results page.
At this stage, also add a manual broad match modifier campaign for your tier-two modifier keywords. Broad match will surface additional search term variations you wouldn’t have thought to target manually. Think of it as a secondary discovery layer running in parallel to your auto campaign, but with the ability to exclude and bid by keyword rather than by targeting group.
Negative Keyword Management: The Second Round
By day ten or eleven, you have enough auto campaign data to do a second negatives pass. This time, look beyond just irrelevant queries — also look for search terms that ARE converting in your manual campaigns but are also showing up in your auto campaign. Add those terms as negative exact match in your auto campaign. This prevents both campaigns from bidding against each other on the same auction, which inflates your cost-per-click and reduces budget efficiency.
This practice — known as campaign isolation — is one of the most commonly skipped steps in Amazon PPC management and one of the most expensive omissions. When your auto and manual campaigns compete for the same auction, you are literally bidding against yourself.
Bid Adjustments Based on First 14 Days of Data
With two full weeks of data, you can now make your first systematic bid adjustments. The rule of thumb for Sponsored Products bids in this phase:
- Keywords with ACoS below your target: raise bids by 10–15% to capture more impression share on proven converters.
- Keywords with ACoS 1.5x your target with fewer than 10 clicks: too early to adjust — wait for more data.
- Keywords with ACoS 1.5x your target with 15+ clicks and zero or one order: reduce bid by 25%.
- Keywords with 30+ clicks and zero orders: pause or add as negatives. No amount of bidding fixes a keyword that doesn’t convert for your product.
The golden rule: never make bid changes on fewer than ten clicks. Statistical noise at small sample sizes will lead you to optimize in the wrong direction. Patience in week two prevents expensive corrections in week four.
Keyword Expansion via Brand Analytics
If you have access to Amazon Brand Analytics, use days eight through fourteen to run a frequency analysis on your category’s top search terms. Brand Analytics shows you which ASINs are winning the most clicks on your target search terms — this is both a competitive intelligence tool and a keyword gap identifier. If there are high-volume category terms your auto campaign hasn’t surfaced yet, add them to your manual broad campaign with a modest test bid.
Days 15–21 — Adding the Mid-Funnel: Sponsored Brands and Display Retargeting
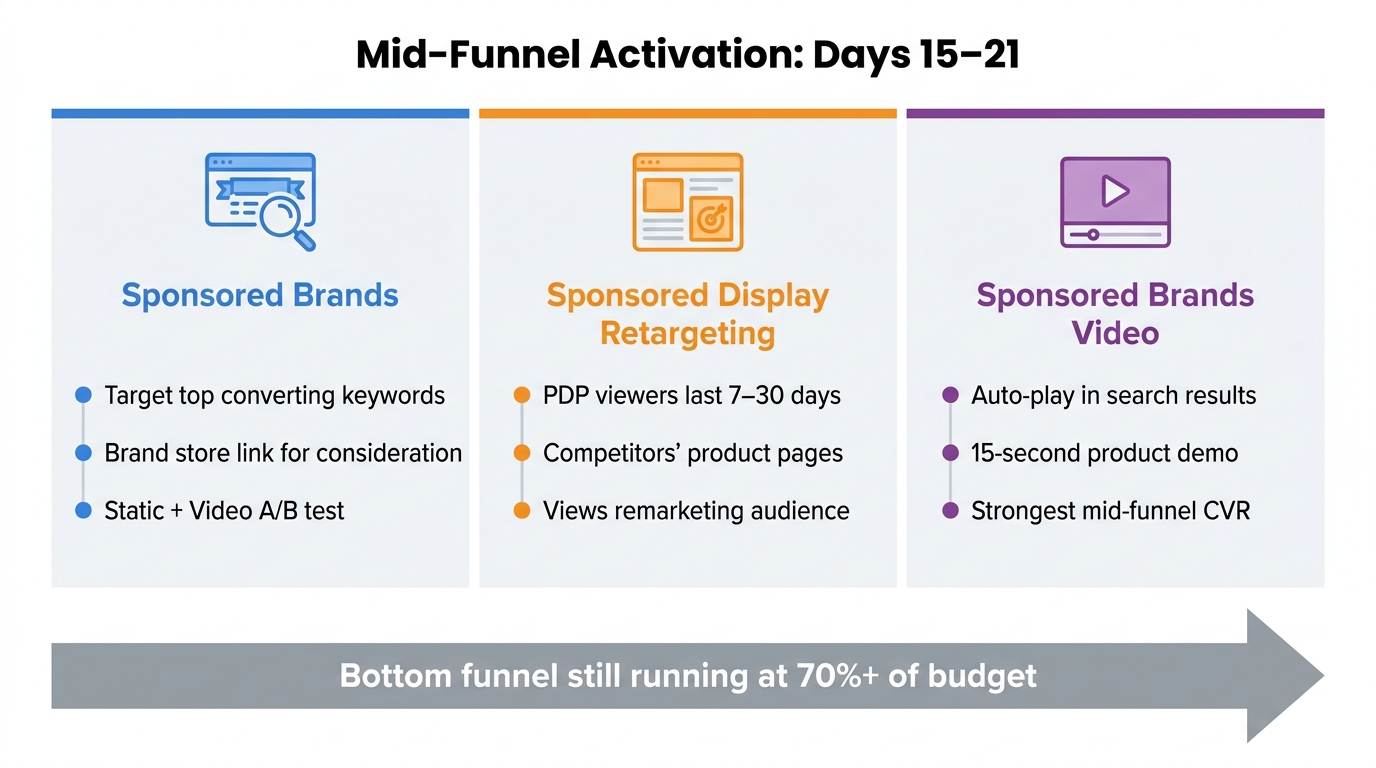
By day fifteen, you have something you didn’t have two weeks ago: real conversion data. You know which search terms convert, at what ACoS, with what click-through rates. That data is the prerequisite for everything in the mid-funnel — without it, your Sponsored Brands targeting is a guess, and your retargeting audience has no purchase-validated signal behind it.
This is the phase where most sellers make the mistake of pivoting too hard. They see their mid-funnel formats as a replacement or upgrade from Sponsored Products, so they shift budget away from the bottom funnel to fund awareness and consideration. This is the wrong move. Bottom-funnel Sponsored Products should continue to receive 70%+ of your total ad budget through day 30. Mid-funnel adds on top; it doesn’t substitute.
Launching Sponsored Brands
Sponsored Brands appear at the top of search results as banner ads featuring your brand logo, a custom headline, and up to three products. They operate in the consideration zone — shoppers clicking a Sponsored Brands ad are typically comparing options rather than ready to immediately buy. Your Brand Store (which you need to have set up as a prerequisite) becomes a landing page for category-level browsing.
For your first Sponsored Brands campaign, keep targeting simple: use the ten to fifteen converting keywords you’ve already validated in your Sponsored Products exact match campaigns. You already know these terms convert — now you’re adding brand-level visibility above the search results on the same queries. This is particularly valuable for brand defense: if a competitor is bidding on your category’s head terms, Sponsored Brands let you claim the top banner position before they can intercept the click.
Set your initial Sponsored Brands budget at 10–15% of your total daily ad budget. Benchmark 2026 industry data puts Sponsored Brands conversion rates at 8–12% for well-optimized campaigns, compared to Sponsored Products which generally run at 9–11%. Don’t expect Sponsored Brands to immediately match the efficiency of your Sponsored Products campaigns — it typically takes two to three weeks of data before Sponsored Brands bids and targeting are properly calibrated.
Sponsored Brands Video: Worth Adding in Week 3?
Sponsored Brands Video ads auto-play in search results without sound (relying on on-screen text and visuals to communicate). They occupy a prominent position mid-page in search results and are one of the stronger mid-funnel formats available for brand-registered sellers.
If you have a 15 to 30-second product video available — even a simple lifestyle or feature demonstration — launching a Sponsored Brands Video campaign in week three is worth doing. Use the same validated converting keywords from your exact match campaigns. The video format typically earns lower CPC than static banner ads and can generate meaningful consideration lift for products where the use case benefits from demonstration (kitchen appliances, fitness equipment, tech accessories, pet products).
If you don’t have video content yet, don’t delay your mid-funnel activation to produce it. A static Sponsored Brands campaign with a strong headline is more useful now than a video that doesn’t exist yet.
Sponsored Display: Setting Up PDP Retargeting
Sponsored Display is the most versatile of Amazon’s self-serve ad formats, capable of running on Amazon search results, product detail pages, and off-Amazon placements across the web. In the first 30 days, focus exclusively on one use case: product detail page views retargeting.
This audience consists of shoppers who visited your product listing but didn’t purchase. They already showed intent — they clicked through, evaluated your product, and left. Retargeting this audience is the highest-efficiency use of Sponsored Display because the audience qualification is already proven.
Set up a Sponsored Display campaign targeting “Views Remarketing” for your own product’s ASIN with a 14-day lookback window. (7 days is too narrow for lower-priced, impulse-purchase products; 30 days is better for considered purchases above $50.) Set optimization to “Conversions” rather than “Reach.” Your daily budget can be modest here — $10–$20 — because until you’ve accumulated significant traffic, the retargeting pool will be small. This will grow as your Sponsored Products campaigns drive more PDP visits.
Separately, consider one Sponsored Display audience campaign targeting shoppers who have viewed competitor ASINs in your subcategory. This is a way to intercept category browsers who are still in the consideration phase and have demonstrated intent on adjacent products.
Days 22–30 — Stitching the Funnel Together and Reading the Right Signals
In the final week of your first month, the priority shifts from building campaigns to reading them as a system rather than as isolated units. This is where the phrase “full funnel” stops being theoretical and starts being measurable.
The Week-Four Campaign Audit
Conduct a structured review of all active campaigns by day 22 or 23. You’re looking for four things across each campaign:
- Budget pacing: Is any campaign hitting daily budget caps before 8 PM? If so, increase budget or reduce bids on low-efficiency keywords to free budget for high-efficiency ones.
- Impression share trends: Are your target keywords gaining or losing impression share week-over-week? Declining impression share often means competitors have increased bids on your target terms — or Amazon has reduced ad eligibility due to listing quality issues.
- Search term cross-pollination: Are the same search terms now appearing in both your auto and manual campaigns? If so, update your negatives list. Campaign isolation remains critical through the entire 30 days.
- Bid-to-rank relationship: For your five highest-priority keywords in your manual exact match campaign, check where your ad is showing up in search results. Amazon’s Campaign Manager shows ad placement (top of search, rest of search, product pages). If your bid is landing your ad at the bottom of page one or on page two, increase the bid for those specific keywords. Placement matters disproportionately in the first 30 days — top-of-search placement generates more conversion signal weight with Amazon’s algorithm than the same sale from a page-two ad.
Your Keyword Graduation List
By day 22 to 25, you should have accumulated enough data to finalize your “core keyword” list — the ten to twenty search terms that have demonstrated consistent conversion and acceptable ACoS across two to three weeks of data. These are the terms you’ll defend aggressively in month two with exact match campaigns, placement multipliers, and branded Sponsored Brands coverage.
This list is also your organic rank priority list. Track where you rank organically for each term at the beginning of day 22, then again at the end of day 30. If your paid sales velocity has been strong, you should see measurable organic rank improvement on your top five terms within the first 30 days. That’s the clearest evidence that your ad spend is working as an organic rank investment, not just a traffic cost.
ACoS vs. TACoS — Why Most 30-Day Reviews Are Reading the Wrong Number
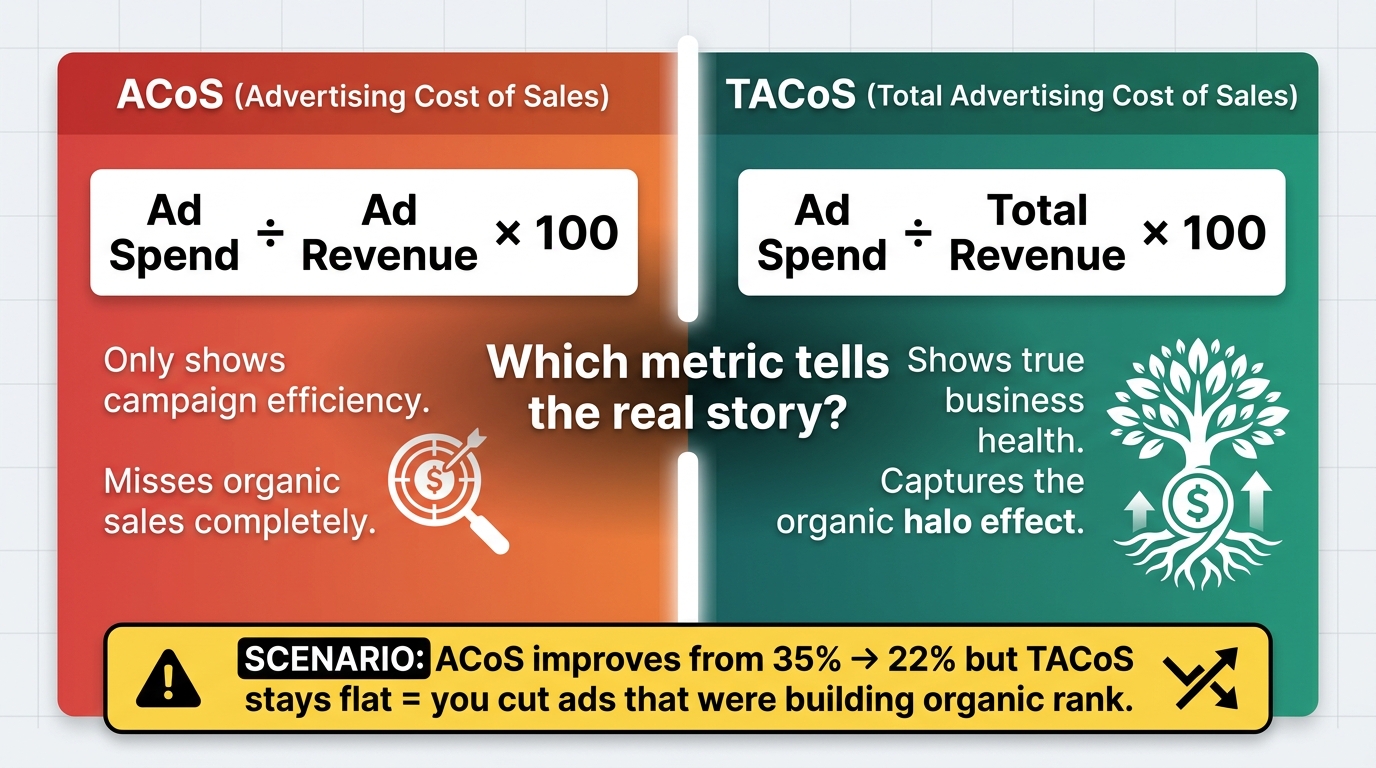
At the end of 30 days, most sellers open their Campaign Manager dashboard, look at their ACoS, and make one of two decisions: keep spending because ACoS looks acceptable, or cut back because ACoS looks too high. Both decisions can be wrong for the same reason — ACoS is a campaign-level metric, and campaigns don’t tell the whole story.
Understanding ACoS
ACoS (Advertising Cost of Sale) measures ad spend as a percentage of ad-attributed revenue. The formula: Ad Spend ÷ Ad-Attributed Revenue × 100. If you spent $500 on ads and those ads were attributed with $2,000 in sales, your ACoS is 25%.
The problem: ACoS only counts sales that Amazon’s algorithm attributes directly to an ad click within a defined attribution window (typically 7 days for Sponsored Products). It does not count organic sales. It does not count sales where the customer saw your ad but converted through an organic click the next day. It does not count repeat purchases from a customer who first found you through an ad three weeks ago.
Understanding TACoS
TACoS (Total Advertising Cost of Sale) fixes this by dividing your ad spend by your total revenue — ad-attributed plus organic. The formula: Ad Spend ÷ Total Revenue × 100. This number tells you how dependent your entire business is on advertising, and whether your ad spend is building organic revenue or just replacing it.
The dynamic to watch: in the first 30 days of a new product, TACoS will typically run 25–40% as ads generate the bulk of your sales. As your organic rank improves and organic sales increase, your TACoS should decline even if your absolute ad spend stays constant or grows — because the denominator (total revenue) is growing faster than the numerator (ad spend). A declining TACoS trend is the clearest signal that your full-funnel strategy is working as intended: ads are seeding organic growth, not just buying temporary visibility.
The Dangerous Scenario
Here’s the trap that catches many sellers: ACoS improves from 35% to 22% because you aggressively cut underperforming keywords and reduce bids across the board. Your campaigns look more efficient on paper. But your total revenue stalls or declines, because you’ve cut the ad spend that was driving both paid and organic sales velocity. TACoS either stays flat or gets worse, because total revenue fell faster than ad spend. Your organic rank quietly slips on keywords you were holding with ad-driven velocity.
This is why TACoS — not ACoS — is the primary success metric for your 30-day review. Your target for month one: a TACoS that starts high (30–45% is not unusual in week one for a new product) and shows a clear downward trend by week four. If TACoS is declining, your organic flywheel is spinning up. If TACoS is flat or rising despite campaign optimization, you have a listing conversion problem or an organic rank problem that no amount of bid management will fix.
Secondary Metrics That Actually Matter
Beyond TACoS, track these four secondary metrics in your 30-day review:
- Organic rank for top 5 target keywords: Track weekly using Helium 10 or an equivalent tool. This is the clearest proof that your ad spend is producing ranking capital.
- New-to-brand order percentage: Available in Campaign Manager for Sponsored Brands campaigns. A high new-to-brand percentage (60%+) means your mid-funnel ads are reaching genuinely new customers, not just retargeting existing buyers.
- Click-through rate by placement: If your top-of-search CTR is significantly higher than rest-of-search CTR, raise your placement bid multiplier for top of search on your best-converting exact match campaigns.
- Search term harvest rate: The number of unique converting search terms you’ve added to manual campaigns across 30 days. A healthy launch should surface 20–50+ unique converting terms in the first month. If you have fewer than 15, your auto campaign bid or targeting breadth may be too narrow.
When (and Whether) to Add DSP to Your First-30-Day Stack
Amazon DSP (Demand Side Platform) is the programmatic advertising layer that extends beyond search-intent targeting. It reaches shoppers based on behavioral signals and demographic data across Amazon-owned properties and third-party publisher sites. It’s also the format with the highest technical barrier, highest budget requirement, and longest data ramp-up time.
The Honest Entry-Point Reality
Amazon’s managed-service DSP typically requires around $50,000 per month — a threshold that puts it well outside the first-30-day budget for most independent brands. Self-serve DSP (accessible via agency partner seats) has no official minimum since Amazon removed it, but practically requires $10,000–$15,000 per month to generate enough impressions for the algorithm to optimize effectively.
For brands spending less than $10,000 per month on total Amazon advertising, DSP should not be part of your first 30-day plan. The budget required to make it work will come directly at the expense of the bottom-funnel Sponsored Products investment that is actually moving your organic rank and building your conversion proof points. You’ll be funding awareness for a product that doesn’t yet have a stable base of conversion data — exactly the structural mistake described at the top of this post.
The Sponsored Display Alternative
For brands in the $1,000–$10,000/month range, Sponsored Display fills much of the retargeting and audience-targeting function that DSP would handle at larger scale. The key difference: Sponsored Display only reaches shoppers within Amazon’s owned ecosystem (on Amazon and Amazon-affiliated properties), while DSP can reach shoppers across the broader web. For first 30 days, that limitation is acceptable — you’re targeting Amazon-context intent, which is the highest-quality signal anyway.
When DSP Does Make Sense in Month One
Two scenarios justify introducing DSP in the first 30 days:
- You’re an established brand with significant off-Amazon awareness: If you’re launching a product on Amazon with an existing customer base and brand search volume, DSP’s remarketing capability can reach your brand’s customers who haven’t yet found your Amazon listing. This is a genuine incremental opportunity, not a speculative spend.
- You’re in a high-consideration, long-cycle category: Products like furniture, mattresses, fitness equipment, or high-end electronics have multi-week purchase journeys. Shoppers research extensively before buying. DSP’s ability to serve ads during that extended consideration phase has a clearer ROI in high-consideration categories than in impulse-purchase verticals.
For everyone else: let your Sponsored Products, Sponsored Brands, and Sponsored Display campaigns prove your conversion story first. DSP’s power is amplifying a proven funnel — it’s not a tool for discovering whether your product can convert.
Amazon Marketing Cloud — What It Can Tell You After 30 Days
Amazon Marketing Cloud (AMC) is a clean-room analytics environment that aggregates signal-level data across all your Amazon ad formats and, critically, shows you how they interact. It’s the tool that answers questions Campaign Manager can’t: What percentage of customers who purchased were exposed to both Sponsored Products and Sponsored Brands before buying? What’s the average number of ad touchpoints before a first purchase? Which ad format contributes most to new-to-brand customer acquisition?
What AMC Reveals After a 30-Day Launch
With 30 days of data in AMC, you can run queries that reveal your actual multi-touch attribution picture. Standard Campaign Manager attribution (last-click, 7-day window) credits only the final ad click before a sale. AMC shows you every ad exposure in the path to purchase — giving you a materially different view of which campaigns are contributing to conversion, even when they’re not the last click.
A common finding in first-month AMC analysis: Sponsored Brands campaigns appear to have poor ROAS in Campaign Manager because they rarely earn the last click. But in AMC’s path-to-purchase analysis, many converting customers had a Sponsored Brands exposure earlier in their journey. This doesn’t mean Sponsored Brands is more efficient than it looks — it means its true contribution requires multi-touch measurement to see.
AMC Audience Building for Month Two
AMC’s second major use in the post-30-day context is audience creation. Because AMC holds up to 25 months of ad signal history and can join that data with retail purchase events, you can build audience segments based on actual purchase behavior — “shoppers who bought my product and also purchased competitor X within 90 days,” for example — and push those audiences into DSP campaigns for month-two targeting. This is a genuine strategic advantage that goes far beyond anything Campaign Manager’s native targeting offers.
AMC requires a separate setup process and is available to brand-registered sellers at no additional cost through the Amazon Ads console. If you haven’t connected it by day 30, make it a day-31 priority. Even if you don’t analyze the data immediately, having AMC collecting from day one means you’ll have a richer data set to work from as you scale into month two and three.
Common 30-Day Mistakes That Are Expensive to Undo
The most consequential mistakes in the first 30 days aren’t the ones that waste a week’s budget — they’re the ones that set up structural problems that take months to unwind. Here are the six that appear most frequently:
1. Mixing Match Types in a Single Campaign
Running auto, broad, phrase, and exact match keywords in a single campaign makes it impossible to allocate budget intelligently or read performance clearly. Auto campaigns and manual campaigns should always be separate. Within manual campaigns, broad/phrase and exact should be in separate campaigns. This isn’t a preference — it’s the minimum structure required for meaningful optimization.
2. Skipping the Negative Keyword Process
In a 30-day launch period, the search term report can surface hundreds of irrelevant queries that your auto and broad campaigns are burning budget on. Every week you skip the negatives review is another week of spend going to queries that have no path to conversion. Build the negative keyword review into your weekly calendar — not as an occasional task but as a fixed operating discipline.
3. Optimizing for ACoS at the Expense of TACoS
As described in the metrics section: aggressively cutting bids and keywords to improve ACoS can mask a declining organic rank and eroding total revenue. Particularly in the first 30 days, ACoS optimization at the cost of velocity is counterproductive. Accept higher ACoS in month one in exchange for the organic rank equity your sales velocity is purchasing.
4. Launching Mid-Funnel Formats on Unvalidated Keywords
Sponsored Brands and Sponsored Display campaigns targeting keywords you haven’t yet proven in Sponsored Products are speculative. You’re paying for brand-level visibility on searches where you don’t yet know you can convert. Always validate conversion in Sponsored Products exact match first, then layer Sponsored Brands onto the same terms.
5. Under-Budgeting the Auto Campaign
Auto campaigns capped at $10–$15 per day in a competitive category won’t generate enough search term data in two weeks to give you meaningful harvesting opportunities. If your auto campaign is pausing every afternoon due to budget exhaustion, you’re leaving search term intelligence on the table. Budget your auto campaign to run fully across the day — check for budget caps and adjust in the first 72 hours.
6. Making Structural Campaign Changes in Week One
Amazon’s ad algorithm needs a minimum of 24–72 hours to respond to bid changes and campaign structural adjustments. Making daily changes in the first week generates noise, not signal. Set campaigns up correctly on day one, make no structural changes before day five, and don’t do your first meaningful optimization pass until day seven with at least a week of data behind you. Patience in week one is worth more than any individual bid tweak.
What Day 31 Should Actually Look Like
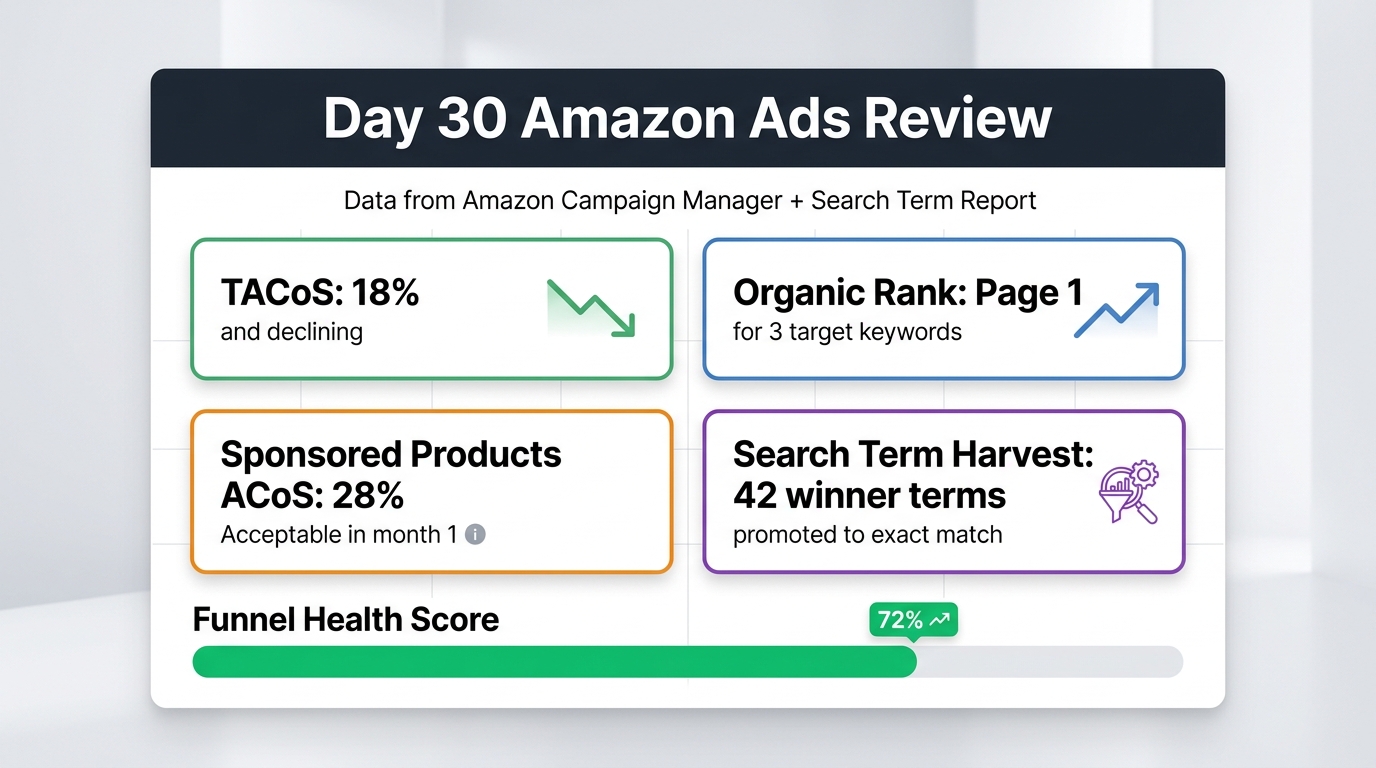
Day 31 is not a finish line — it’s a relaunch point. The decisions you make on day 31 are informed by 30 days of actual performance data rather than pre-launch estimates. That’s the real value of the first 30 days: turning assumptions into evidence.
The Day-31 Decision Framework
Arrive at day 31 with answers to these specific questions:
On Sponsored Products: Which five to ten exact match keywords have demonstrated the best combination of conversion rate and search volume? These become your month-two core targeting set with elevated bids and placement multipliers. Which keywords have 30+ clicks and ACoS 2x your target? These are strong pause candidates entering month two — they’ve had enough data time to prove they’re either margin-negative or simply not relevant for your product.
On Sponsored Brands: What’s your new-to-brand order percentage? If it’s above 50%, your Sponsored Brands campaign is successfully reaching new customers — increase budget here in month two. If it’s below 30%, you may be primarily retargeting existing customers who would have bought anyway — a signal to adjust targeting toward broader, category-level keywords rather than branded or narrow terms.
On Sponsored Display: Has your retargeting pool grown enough to be meaningful? If your PDP visit volume from Sponsored Products traffic is generating 200+ retargetable shoppers per week, increase your Sponsored Display retargeting budget. If the pool is still very small, focus month-two traffic growth on the Sponsored Products campaigns rather than optimizing the retargeting layer on top of insufficient traffic.
On organic rank: Where did you start on day one for your top five keywords, and where are you on day 31? If you’ve moved from page three to page two, or from position 20 on page one to position 10, your velocity strategy is working. If organic rank hasn’t moved despite significant spend, examine your listing conversion rate — if shoppers are clicking but not buying, the ads are generating data about a conversion problem, not an ad problem.
Month-Two Budget Realignment
Based on your 30-day data, realign your budget allocation for month two using a more data-informed split. A typical well-performing first-month launch might enter month two with a budget structure like this: 55–65% to Sponsored Products (your proven converters), 15–20% to Sponsored Brands (validated mid-funnel keywords), 10–15% to Sponsored Display (growing retargeting pool), and 5–10% reserved for testing new keyword clusters surfaced in month one’s harvesting. This is not a fixed template — it reflects the data coming from your specific campaigns, category, and product. The key shift from month one is that you’re now optimizing for a balance of TACoS trend and profitability, not just velocity and data collection.
Conclusion: The 30-Day Sequence Is the Strategy
The single most useful reframe for full-funnel Amazon advertising in the first 30 days is this: the sequence is the strategy, not the formats.
Choosing Sponsored Products before Sponsored Brands before DSP isn’t just a budget-conservation decision — it’s a logical dependency chain. Each stage feeds the next with data, proof of conversion, and audience signal. Without bottom-funnel conversion data, your mid-funnel targeting is speculative. Without mid-funnel audience data, your upper-funnel awareness spend has no validated customer to retarget. Skip the sequence, and you don’t have a full funnel — you have an expensive collection of unconnected campaigns.
Here are the five concrete takeaways to carry into your implementation:
- Retail readiness before ad launch, without exception. Six criteria: images (7+), A+ Content, reviews (10+), optimized copy, Buy Box ownership, and 60+ days of inventory. If you score below four of six, fix the listing first.
- Auto campaign in week one, manual exact in week two. Let discovery drive week one. Let validated data drive week two’s manual campaign build. Don’t reverse this order.
- Negatives every week, not every month. The search term report is your most valuable optimization tool. Build a weekly review into your calendar from day seven onward.
- Track TACoS as your primary success metric, not ACoS. A declining TACoS trend by week four means your organic flywheel is working. A flat or rising TACoS means your listing has a conversion problem no bid change will solve.
- Mid-funnel on day 15, not day one. Sponsored Brands and Sponsored Display retargeting activate in week three, funded by what’s been validated in weeks one and two. Upper funnel only when your bottom funnel is stable, your conversion is proven, and your budget justifies it.
The first 30 days won’t make your Amazon business — but they will set the operating conditions for the next six months. A well-structured first month gives you keyword intelligence, organic ranking momentum, a retargeting audience in the making, and a data-informed decision framework. A poorly structured one gives you a higher ACoS, a flat TACoS, and a month-two optimization problem that traces back to decisions made on day one.
Build it right before you scale it. That’s the plan.