
Prime Day feels like a win. Sales spike, BSR climbs, your campaigns fire on all cylinders, and for two or three days the numbers look better than they have all year. Then the event ends — and your ACoS quietly falls off a cliff in the wrong direction.
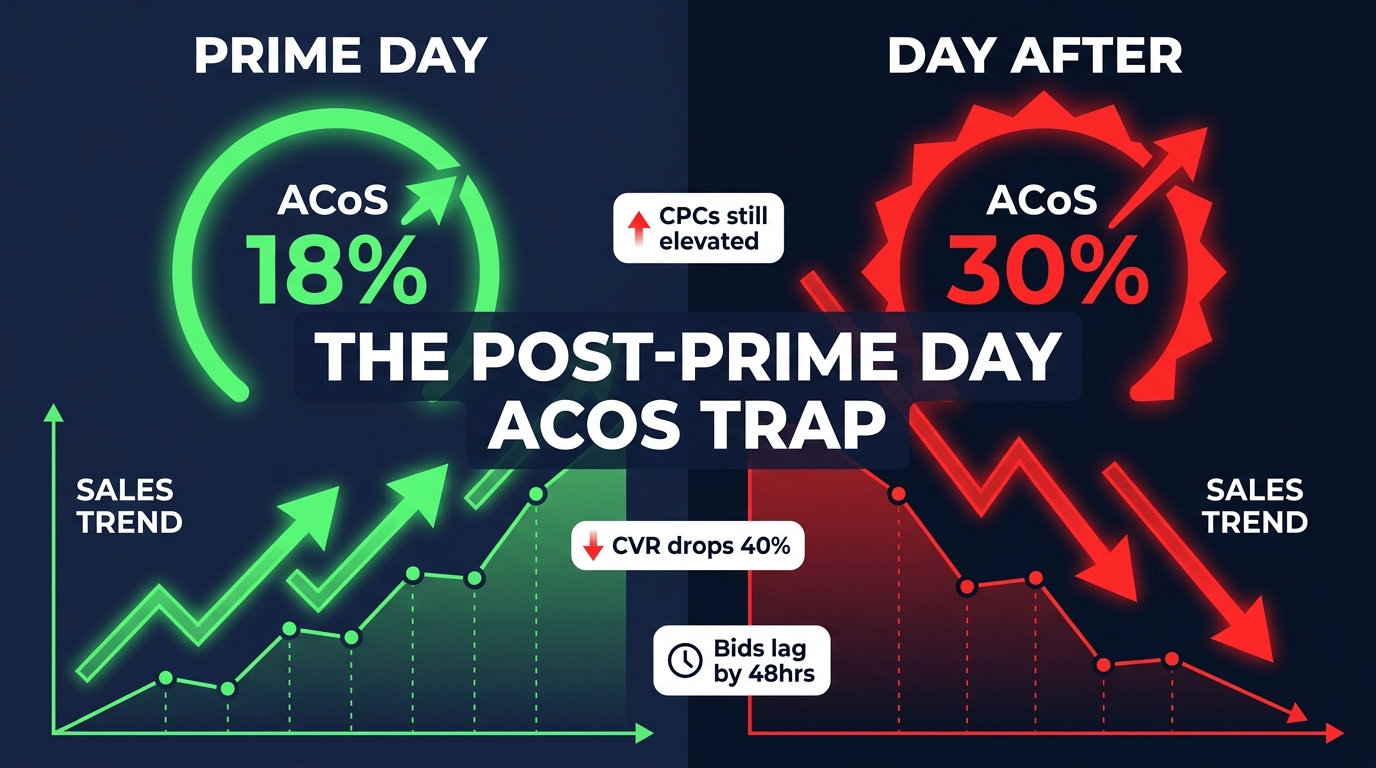
This is one of the most consistent, data-backed patterns in Amazon advertising, and yet it catches sellers off guard every single year. A 56-account dataset from Seller Stack found that while peak Prime Day ACoS averaged around 18%, the cooldown days immediately after the event pushed ACoS up to 26–30%, with the day directly following Prime Day registering the worst ACoS in the entire event window. Not during the event. After it.
The reason is mechanical: bids and budgets you aggressively ramped up for the event stay elevated, while conversion rates drop sharply as deal-hungry shoppers move on and regular traffic resumes. You’re paying event-level CPCs for everyday intent. Every hour you wait to act, that gap costs you margin.
But the solution isn’t to panic and hard-reset everything. That’s actually the second most common mistake, right after doing nothing at all. A poorly timed mass bid cut can crater the organic rank lift you just earned from Prime Day’s sales velocity spike — and that halo effect is genuinely valuable, often sustaining elevated organic traffic for 7–14 days post-event.
What you need is a structured clean-up: a sequenced, data-driven process that stops the bleeding at the campaign level, extracts every lesson Prime Day’s surge data just taught you, and transitions your account back to evergreen efficiency without sacrificing the ranking gains you just paid to earn.
That’s exactly what this guide covers — from the 48-hour triage window through a four-week bid wind-down, with the specific report pulls, thresholds, and decisions that actually move ACoS back in the right direction.
Why ACoS Spikes After Prime Day (Not During It)

To fix the problem, you need to understand exactly what causes it. The post-Prime Day ACoS spike isn’t a sign that your targeting is wrong or your products are suddenly less competitive. It’s almost entirely a structural phenomenon driven by what practitioners call bid lag.
The Bid-Lag Mechanism
In the weeks before Prime Day, you raised bids aggressively — often 40–80% above your normal levels — to compete for visibility during the highest-traffic window of the first half of the year. CPCs across Amazon typically surge 40–80% industry-wide during Prime Day 2026, so you had to raise bids just to maintain impression share.
During the event itself, this investment pays off. Conversion rates spike because Prime Day shoppers are actively hunting for deals, urgency is high, and your discounts or coupons close the gap between browsing and buying. Your ACoS actually looks better than usual during the event — that 18% average from the Seller Stack data reflects a temporary CVR surge absorbing the inflated CPCs.
When Prime Day ends, two things happen simultaneously:
- Conversion rates fall back to normal — often sharply, within 24 hours, as the deal-seeking audience exits and everyday traffic returns.
- Bids and budgets stay at event levels — because most sellers either don’t act immediately or wait for data before making changes.
The result: you’re now paying 40–80% above your sustainable CPCs for traffic that converts at your normal (lower) rate. ACoS math is simple: Ad Spend ÷ Ad-Attributed Sales. When spend stays high and revenue comes down, that ratio gets ugly fast.
Why ~40% of Sellers Lose Margin Despite Higher Revenue
Industry data consistently finds that roughly 40% of Amazon sellers report lower profit margins after Prime Day, even in years where they hit their revenue targets. This isn’t about the event itself — most sellers do well during the event. It’s about the 7–14 days that follow, when inflated ad costs compound with returning-to-normal pricing (if deals have ended) and elevated logistics costs from fulfillment spikes.
The sellers who come out of Prime Day with healthy margin profiles are typically the ones who treated the cool-down as its own optimization project — not an afterthought.
The Halo Effect Complicates the Math
There is one important variable that makes this more nuanced: the organic rank halo. Strong Prime Day sales volume sends powerful velocity signals to Amazon’s algorithm, which can lift your organic rank — and therefore your organic revenue — for 7–14 days post-event. This means your total business performance may look better than your ad-attributed metrics suggest.
This is exactly why ACoS alone is a misleading lens for post-event decisions. More on that when we get to TACoS. First, let’s cover what to do in the critical first 48 hours.
The 48-Hour Triage Window: What to Do Before Campaigns Keep Bleeding
The first 48 hours after Prime Day ends are the highest-leverage window in the entire clean-up process. You won’t have complete attribution data yet — Amazon’s 14-day attribution window means some conversions are still pending — but you have enough to stop the most obvious spending on its tracks.
Step 1: Pause or Reduce Budgets on Pure Event Campaigns
If you built dedicated “Prime Day campaigns” — separate campaigns with event-specific bids, budgets, and targeting — these should be paused or dramatically reduced within hours of the event ending. They were built for a specific traffic and conversion context that no longer exists.
Do not delete them. You’ll want the data. Just pause the spending.
If you ran your Prime Day spend on top of your existing evergreen campaigns by layering in budget increases and bid adjustments, you’ll need to be more surgical. The goal here is not to slash everything — it’s to identify the highest-spend, lowest-converting segments and act on those specifically.
Step 2: Pull the Right Reports Immediately
Navigate to Measurement & Reporting → Sponsored Ads Reports in Seller Central and pull the following for the Prime Day window plus 48 hours after:
- Search Term Report — for all active Sponsored Products, Sponsored Brands, and Sponsored Display campaigns
- Campaign Performance Report — to see spend, sales, ACoS, and impressions at the campaign level
- Placement Report — to see how Top of Search vs. Product Pages vs. Rest of Search performed during and immediately after the event
Set your date range to cover at minimum the two days before Prime Day through the current day. You want pre-event, event, and post-event data in the same pull so you can compare.
Step 3: Implement an Immediate Bid Reduction — But Not a Hard Reset
Expert guidance for 2026 converges clearly on one point: reduce bids by 15–20% immediately after the event, but do not hard-reset to pre-event levels. Here’s why.
Your pre-event bids were calibrated to a market where the Prime Day velocity lift hadn’t happened yet. If your organic rank has genuinely improved — which it should have if your event sales were strong — then your total value from each ad dollar has actually increased. Cutting bids all the way back to pre-event levels can cause you to lose impression share at a moment when your organic rank lift is compounding your total returns.
The 15–20% initial reduction stops the bleed without overcorrecting. Think of it as your first stabilization cut, not your final bid level. You’ll make more precise adjustments over the next four weeks based on actual performance data.
Step 4: Freeze Any Active Bid Rules or AI-Driven Automation Temporarily
If you’re using Amazon’s Dynamic Bidding (Down Only, Up and Down, or Fixed), third-party bid automation, or custom rules in your ad management platform, pause or override them for the first 72 hours post-event. These systems were trained or optimized on pre-event data. They don’t inherently “know” that Prime Day just ended, and they may continue pushing bids up based on event-period impression and click patterns that are no longer relevant.
Manual control in the first three days gives you a clean baseline before re-engaging automation with fresh post-event data.
Pulling and Segmenting Your Search Term Data the Right Way
Your Search Term Report from the Prime Day window is the most valuable data asset you’ll produce all year. Prime Day sends a flood of high-intent traffic across your product catalog — traffic that, at scale, reveals which search queries actually convert your specific audience at your specific price points. Treating this data as a routine report pull is a serious missed opportunity.
The Right Date Windows to Compare
Pull three separate date ranges when running your post-event analysis:
- 60–90 days pre-Prime Day — your evergreen baseline performance by search term
- Prime Day window only (the event dates themselves)
- 7–14 days post-Prime Day — the cooldown and halo period
Comparing all three periods lets you answer the most important questions: Which search terms are consistently strong regardless of the event context? Which ones only performed because of deal-seeking behavior? Which ones emerged as new winners during the event that you weren’t previously targeting efficiently?
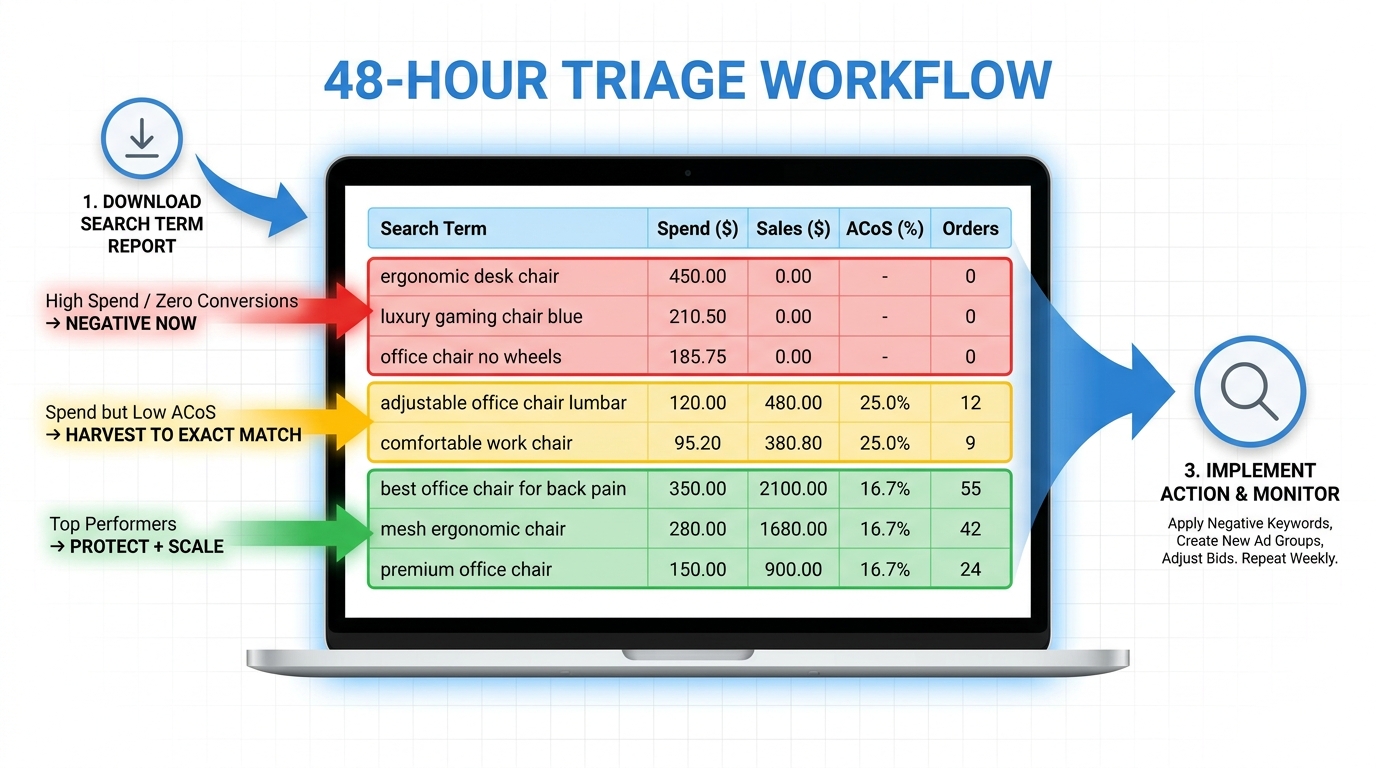
How to Segment Your Search Terms Into Four Buckets
Once you have your data, sort by Spend (highest to lowest) and apply the following segmentation logic:
Bucket 1: High Spend, Zero or Near-Zero Conversions
These are your immediate negative keyword candidates. Any search term that spent more than your target CPA (or a fixed threshold like $15–$25 depending on your margin) with zero orders should be added as a negative keyword within 24–48 hours. Don’t overthink the threshold — if a term spent more than the value of a sale and delivered nothing, the data has already made the decision for you.
Bucket 2: High Spend, High ACoS (Above Your Target)
These aren’t automatically waste — they may be terms that convert but at inefficient rates. Reduce bids on these terms by 20–30% rather than negating them. Let them run at lower bids and reassess in two weeks.
Bucket 3: Acceptable ACoS, Multiple Conversions
These are your harvest candidates — search terms that performed well during or after the event and should be promoted to exact-match targeting in your evergreen campaigns. These represent real, validated demand for your products at specific search queries.
Bucket 4: High ACoS During Event, but Improving Post-Event
These are tricky. A term that looked expensive during Prime Day’s inflated CPC environment might actually be quite efficient now that CPCs are normalizing. Don’t knee-jerk these into negatives. Watch them for one more week before deciding.
Build a Running Negative Keyword Master List
One underused practice: maintain a running negative keyword log that you update after every major event or monthly audit cycle. Every term you identify as waste from the Prime Day data should go into this master list, segmented by campaign type. Over time, this becomes one of the highest-ROI documents in your Amazon operation — a compounding asset that prevents the same dollars from being wasted repeatedly.
The Negative Keyword Sprint: Clearing Waste Without Choking Traffic
Negative keywords are the most direct lever for ACoS reduction, and the post-Prime Day window gives you more data to work with than any other period in the calendar. The challenge is applying them precisely enough to stop waste without accidentally blocking converting traffic.
Negative Phrase vs. Negative Exact: When to Use Each
The choice between negative phrase and negative exact match has real consequences that many sellers get wrong.
Negative exact match blocks only that precise query. Use it when you want to block a specific non-converting term but still allow related terms to show. Example: negating [cheap widget] as exact still allows your campaign to show for “affordable widget” or “discount widget.”
Negative phrase match blocks any query containing that phrase in that order. Use it for categories of irrelevant traffic. Example: adding “DIY” as a negative phrase blocks all queries containing that word — useful if you sell professional-grade tools that keep showing up in DIY searches.
The common mistake is defaulting to negative phrase for everything. This is how sellers accidentally block large swaths of converting traffic because one word in a performing query happens to appear in a phrase they negated elsewhere.
Campaign-Level vs. Ad-Group-Level Negatives
Negative keywords applied at the campaign level block traffic for all ad groups within that campaign. This is appropriate for clearly irrelevant categories of traffic — competitor brand names you don’t want to appear against, size or color variants you don’t carry, or intent signals that don’t match your product category at all.
Negative keywords at the ad-group level give you finer control — essential when one ad group contains a specific product that should be blocked from a query while another product in the same campaign would actually convert that query well.
A clean structure runs campaign-level negatives for the broadest exclusions, then uses ad-group negatives for the nuanced cases. Don’t apply all negatives at the campaign level just because it’s faster — the imprecision will cost you.
The 24–48 Hour vs. 7-Day Negative Schedule
Not all negative decisions need to be made at once. A two-pass approach works well:
- Pass 1 (24–48 hours post-event): Implement negatives for terms with clear, high-confidence waste — high spend, zero conversions, no plausible path to relevance. These are easy calls. Don’t overthink them.
- Pass 2 (Day 7–10 post-event): With a full week of post-event data, you can now see how borderline terms performed once event traffic normalized. Some high-ACoS terms from Prime Day will look much better in week two. Others will confirm their waste. Make your calls on the ambiguous cases here.
This two-pass approach prevents over-negating during a data-thin window and builds a more defensible keyword architecture for Q3.
Harvesting Winners Into Evergreen Exact-Match Campaigns
The clean-up side of post-Prime Day PPC work gets most of the attention. But equally important — and more directly tied to long-term ACoS improvement — is harvesting the search terms that did perform well from your auto and broad campaigns into tight, managed exact-match campaigns.
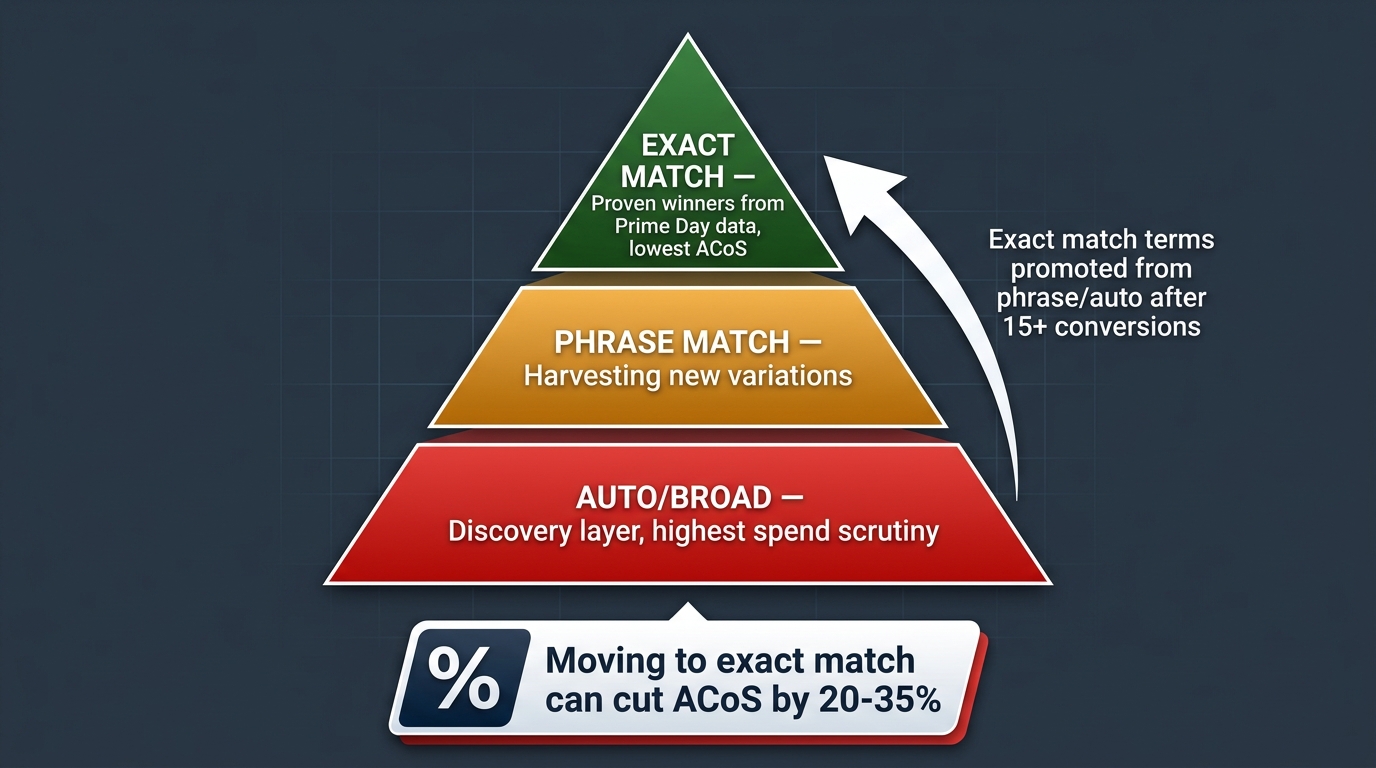
Why Exact Match Is the Destination
Exact-match targeting gives you the highest degree of control over when and where your ads appear. When a proven search term — one you now have real conversion data for — sits in an auto campaign or a broad match campaign, it’s sharing budget and bid logic with dozens or hundreds of other terms. You can’t optimize it individually, you can’t set a specific bid based on its known economics, and you can’t isolate its performance clearly.
Moving that term into a dedicated exact-match campaign changes all of that. You set a bid based on the term’s known ACoS and conversion rate. You can monitor its performance in isolation. And you add it as a negative exact to the auto/broad campaigns it came from, preventing overlap that would split attribution and distort your data.
This is what “harvesting” means in practice: a deliberate, systematic process of promoting validated terms from broad discovery into precise, manageable targeting.
The Conversion Threshold for Harvesting
A commonly used threshold for promoting a search term to exact match is 3–5 conversions within a 30-day period at an ACoS at or below your target. Some practitioners raise this to 10–15 conversions before acting, preferring more statistical confidence. The Prime Day window gives you a compression advantage here — the volume surge means you can hit those thresholds in 2–3 days that would normally take weeks.
Review your Prime Day search term data and flag any term that hit your threshold during the event period. Even if some of those conversions were driven by deal-seeking behavior, if the term shows acceptable ACoS in your evergreen data too, it belongs in an exact match campaign.
How to Set Opening Bids on Newly Harvested Terms
When launching a new exact-match campaign with harvested terms, don’t set opening bids at the same level they were running in the auto/broad parent campaign. Those bids were calibrated for a different matching environment. Instead:
- Calculate the average CPC for that term from its search term report data
- Identify your target ACoS and your product’s average order value
- Set your opening exact-match bid at: Target ACoS × Average Order Value × Conversion Rate
- Let it run for 7–14 days before adjusting based on actual exact-match performance
This formula gives you a bid that is theoretically break-even at your target ACoS, which is a reasonable starting point before you have match-type-specific data.
The Isolation Rule: Negative Out the Source Campaigns
Every term you harvest into an exact-match campaign must be negated as exact match in the auto and broad campaigns it came from. Failing to do this results in the same term being targeted in multiple campaigns simultaneously — which splits your attribution data, inflates your perceived total spend on that term, and makes it impossible to evaluate performance accurately. This is a structural hygiene step that many sellers skip, and it quietly corrupts their account data for months.
Placement Modifier Reset: Top of Search, Product Pages, and Rest of Search
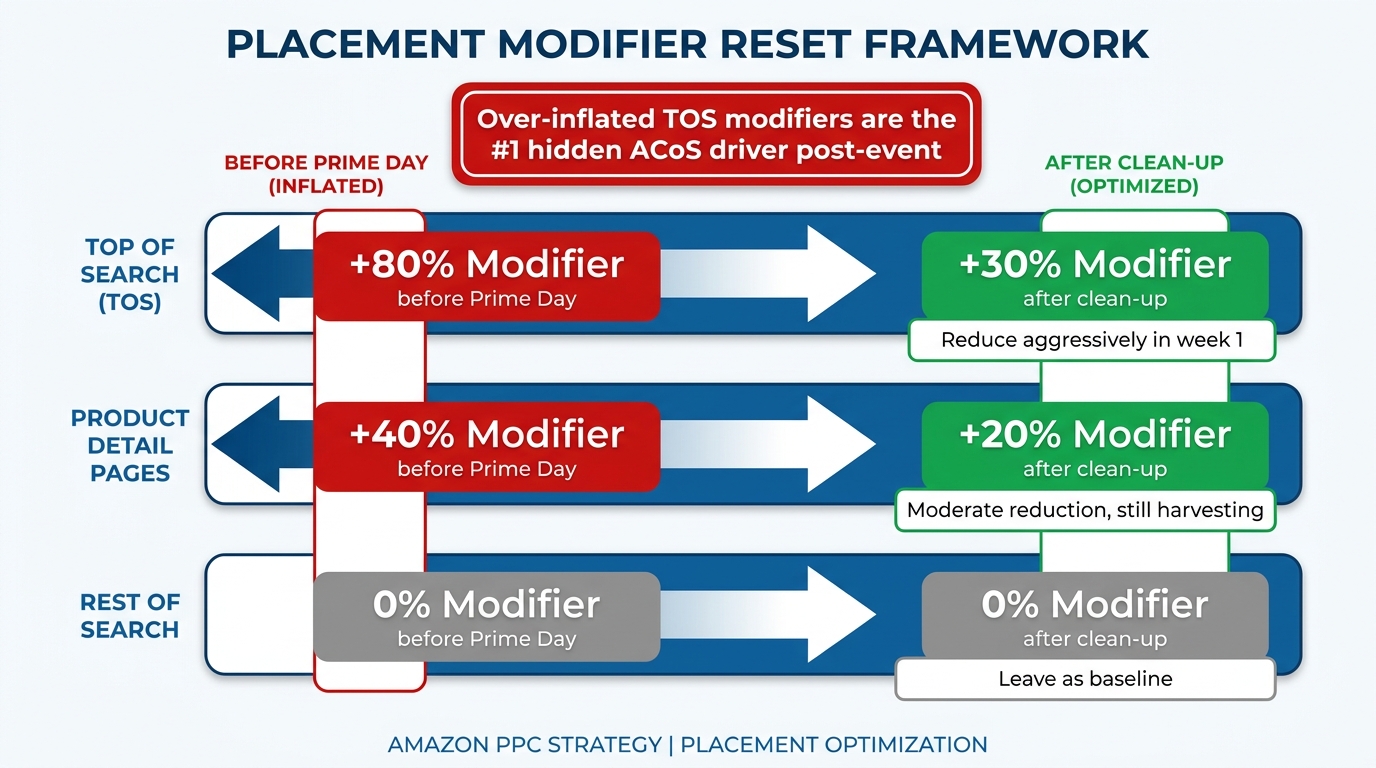
Placement bid modifiers are one of the most overlooked contributors to post-Prime Day ACoS inflation. Most sellers remember to address bids and negatives but forget that they also ramped up placement multipliers before the event — and those adjustments stay in place until you explicitly change them.
Understanding What Happened to Your Placement Modifiers During Prime Day
In the weeks before Prime Day, the standard advice is to increase your Top of Search (TOS) placement modifier significantly — often to +50% to +100% above your base bid — to compete for the high-visibility positions that drive the most conversion during the event. Some advertisers went even higher depending on their category competitiveness.
During Prime Day, this investment was rational: TOS placement converts at a premium during high-intent shopping events, and the elevated conversion rates justified the higher effective CPC. Post-event, that math breaks completely. A +80% TOS modifier on a bid that was already raised 15–20% for the event means you’re paying compounding premiums for placement that is now reverting to normal conversion rates.
The Right Way to Unwind Placement Modifiers
Your Placement Report (pull it from Sponsored Ads Reports) will show you conversion rate, ACoS, and spend broken down by Top of Search, Product Pages, and Rest of Search. Use this data to make placement decisions, not assumptions.
A practical staged approach:
- Week 1: Reduce TOS modifier from its event peak to approximately +20–40% depending on your category’s normal TOS premium. This is a significant cut but keeps you competitive for high-intent post-event shoppers.
- Week 2: Pull fresh Placement Report data. If TOS ACoS is still above target, cut to +10–20%. If it’s within range, hold.
- Week 3–4: Return to your standard pre-event TOS modifier level, which should be based on your historical placement-level performance data, not a guess.
For Product Detail Page placements, the math is different. Product pages typically have lower conversion rates than TOS but can still be efficient — and post-Prime Day they can capture competitor traffic as shoppers browse alternatives after missing a deal. Moderate reductions (cutting by 30–50% of your event modifier, not eliminating the modifier entirely) are usually the right call.
The Hidden ACoS Driver Nobody Talks About
Experienced Amazon advertisers know this, but it’s worth stating explicitly: over-inflated TOS placement modifiers that weren’t unwound after an event are one of the most common causes of sustained high ACoS in the weeks following Prime Day. The bid itself might look reasonable in isolation. The placement modifier is doubling or tripling the effective CPC on every TOS impression. This is invisible unless you’re specifically looking at placement-level performance data.
If your ACoS recovery feels stuck in week two or three despite bid reductions and negative keyword cleanup, check your placement modifiers before assuming the problem is something else.
The 4-Week Bid Wind-Down Framework
One of the clearest findings from post-Prime Day optimization research is that the sellers who recover best are not the ones who cut hardest or fastest — they’re the ones who cut most deliberately. A structured, time-phased wind-down outperforms both the panic reset and the wait-and-see approach.
Here is the framework that advanced Amazon advertisers use across the 30 days following a major event:
Week 1: Stabilize and Stop the Bleed (Days 1–7)
Bids: Reduce all active campaign bids by 15–20% from their event peak levels. This is your first correction, not your last. Apply it broadly across all campaigns that were elevated for the event.
Budgets: Keep daily budgets at approximately 1.5× your normal baseline. This sounds counterintuitive when you’re trying to reduce ACoS, but the rationale is sound: organic rank from Prime Day’s sales velocity is still propagating through the algorithm. Higher impression share right now reinforces that ranking signal. Cutting budgets too aggressively in week one can starve your campaigns at exactly the moment your organic rank lift is working in your favor.
Data work: Complete your first-pass negative keyword additions. Pause any dedicated event campaigns. Pull all reports needed for the analysis outlined above.
Week 2: Monitor TACoS, Protect the Rank Halo (Days 8–14)
Bids: Hold at Week 1 levels unless TACoS is climbing. If your total revenue is holding up due to organic lift, there’s no need to cut further yet.
Budgets: Begin stepping budgets down from 1.5× toward 1.2× normal. Reduce by roughly 10% per week rather than making sharp cuts.
Data work: Complete your second-pass negative keyword additions. Begin harvesting validated search terms into exact-match campaigns. Monitor organic rank on your primary keywords — if it’s holding or growing, maintain current bid levels. If organic rank is slipping, consider holding bids higher for another week.
Week 3: Precision Bid Cuts by Campaign and Keyword (Days 15–21)
Bids: Now that you have two weeks of post-event data, you can make precise, campaign-level and keyword-level bid decisions rather than blanket percentage cuts. Identify which campaigns are consistently above or below your ACoS target and adjust accordingly — some may need further cuts, others may be running efficiently and need no change.
Budgets: Move toward normal baseline. Most campaigns should be approaching or at their standard pre-event budget levels by end of Week 3.
Data work: Assess the performance of your newly launched exact-match campaigns. Adjust opening bids based on first two weeks of exact-match-specific data.
Week 4: Return to Evergreen Optimization Cadence (Days 22–30)
Bids and budgets: Fully normalize to your standard evergreen levels, now calibrated with the new data from Prime Day harvesting.
Re-enable automation: If you paused bid rules or AI automation in Week 1, this is the point to re-engage them — but feed them the post-event data window (not the event data itself) as their training baseline.
Structural assessment: Evaluate whether your campaign structure needs permanent changes based on what Prime Day revealed. This is covered in the next section.
TACoS as the Real Recovery Signal — Why ACoS Alone Will Mislead You
This is perhaps the most important conceptual shift in post-Prime Day PPC management, and it’s where a lot of otherwise competent advertisers go wrong.
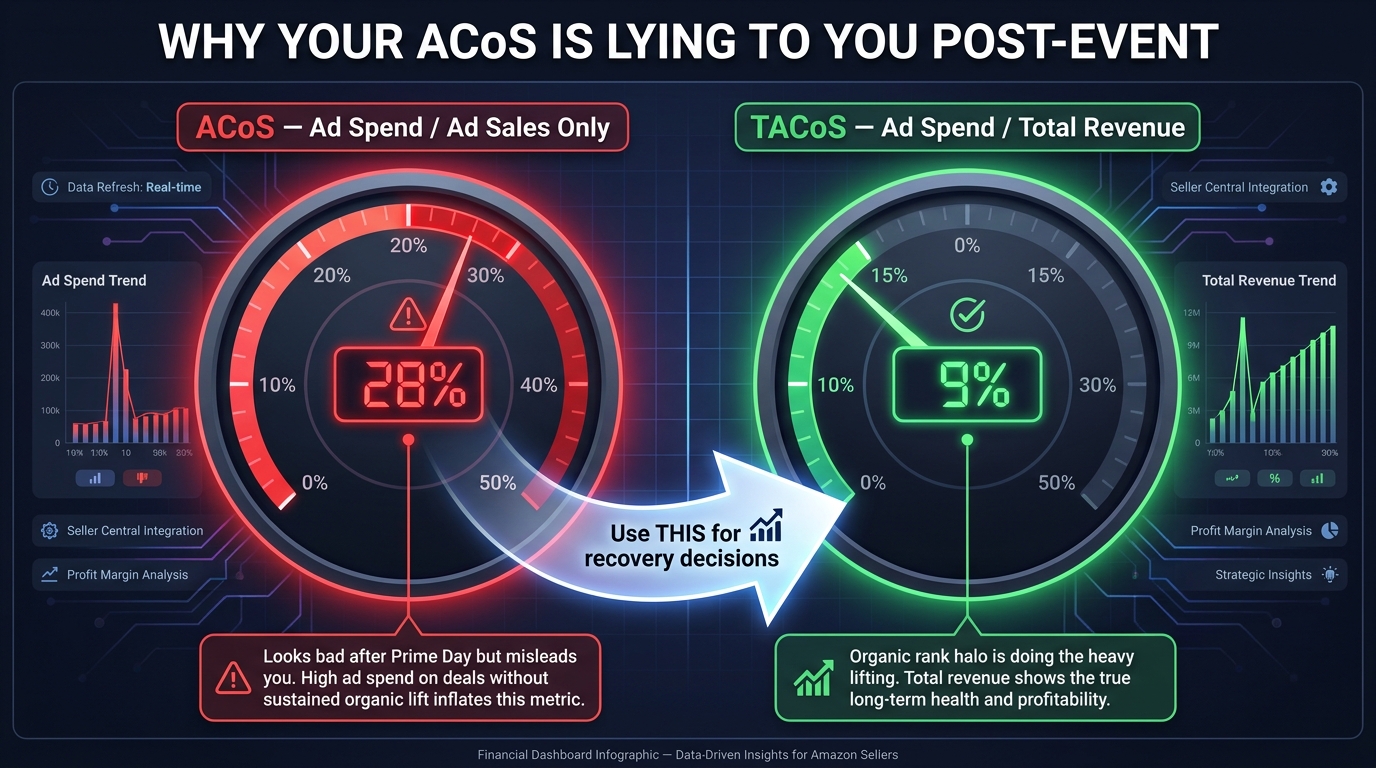
ACoS — Ad Cost of Sale — measures ad spend divided by ad-attributed revenue only. It tells you how efficiently your ads are generating ad-attributed sales. What it doesn’t tell you is what’s happening to your organic revenue at the same time.
The Post-Prime Day TACoS Divergence
In the 7–14 days following Prime Day, a well-run account will often show ACoS that looks higher than your target, while total business performance is actually strong. This happens because organic rank has improved and organic revenue has increased — but those organic sales don’t appear in your ACoS calculation at all.
TACoS — Total Advertising Cost of Sale — closes this gap. The formula is: Ad Spend ÷ Total Revenue (ad-attributed + organic). When organic revenue is elevated due to Prime Day’s rank lift, TACoS will look considerably better than ACoS during the same period.
If you use ACoS as your sole signal and see it sitting at 28% (above your 20% target), you might cut bids aggressively. But if your TACoS is at 9% because organic revenue has tripled, cutting bids would be the wrong move — you’d be pulling back on advertising at a moment when the combined paid + organic flywheel is running efficiently.
Practical TACoS Benchmarks for Post-Event Recovery
Most Amazon product categories have healthy TACoS ranges. For mature, established products: 6–12% TACoS is generally considered efficient. For newer products still building organic rank: 15–25% is acceptable as advertising drives rank-building. These aren’t universal standards, but they provide orientation.
During your post-Prime Day recovery, track TACoS weekly. If it’s trending downward week over week while your total revenue holds — you’re in recovery mode and working correctly. If TACoS is rising while total revenue is falling, you have a structural problem that needs attention regardless of what individual ACoS numbers show.
How to Pull TACoS Manually From Seller Central
Amazon doesn’t surface TACoS natively in a single report. You need to:
- Pull your total ad spend from Sponsored Ads Reports (Business Report → Campaign Performance)
- Pull your total revenue (including organic) from Business Reports → Sales & Traffic
- Calculate: Total Ad Spend ÷ Total Revenue × 100
Many third-party advertising tools (Helium 10, Perpetua, Pacvue, DataHawk) surface TACoS natively. If you’re managing a significant ad budget, having TACoS tracked automatically rather than calculated manually is worth the tool investment.
Campaign Structure Decisions That Outlast the Clean-Up
The post-Prime Day window isn’t just a damage control exercise. It’s the best data-gathering opportunity of the year, and the insights it surfaces should inform permanent changes to how your account is structured — not just temporary bid adjustments.
Separate Event Campaigns From Evergreen Campaigns (Before the Next Event)
One of the most valuable structural practices is maintaining a clean separation between campaigns built for events (Prime Day, Black Friday, Lightning Deals windows) and your evergreen infrastructure. When event campaigns sit on top of evergreen ones — sharing ad groups, targeting, and budget pools — you get attribution blending that corrupts your understanding of what’s actually working in your normal business versus what only works during promotional spikes.
For the next event cycle, build event campaigns as entirely separate entities: new campaign names, separate budgets, dedicated targeting, and a clear end date. When the event ends, you pause them cleanly and your evergreen account continues running on untainted data.
What Prime Day Revealed About Your Match Type Mix
The volume surge from Prime Day acts as a stress test on your campaign architecture. Common structural problems that Prime Day data reveals:
- Too much reliance on auto campaigns: Auto campaigns that spent heavily during the event often contain a mix of irrelevant query matches that only showed up because traffic volume was so high. If auto campaigns represented more than 40% of your total event spend, you likely have an over-reliance on discovery-layer targeting that needs rebalancing toward manual precision.
- Cannibalization between broad and exact: If the same keyword appears in both your broad and exact match campaigns, they’re competing against each other. Prime Day data makes this visible at scale. Use the clean-up to add exact negatives to all broad and phrase campaigns for any terms you’ve migrated to exact match.
- Missing product-targeting campaigns: Prime Day’s elevated traffic volume often surfaces strong product-page targeting opportunities — competitor ASINs where your product converts well against theirs. If you don’t have dedicated Sponsored Product or Sponsored Display campaigns targeting specific competitor ASINs, now is the time to build them using the product-page placement data from your post-event reports.
Rebuilding With Q3 and Q4 in Mind
Prime Day typically sits in the first half of the year (2026’s event ran June 23–26). That means the clean-up period overlaps with the beginning of your Q3 planning. The campaigns and keyword structures you build now will be the foundation for back-to-school, fall promotions, and early Q4 setup. Decisions made during post-Prime Day clean-up have a compounding effect on the rest of the year.
Treat the structural changes you make in the 30 days after Prime Day as deliberately building toward your Q4 readiness, not just recovering from an event. This framing changes the quality and intentionality of the work.
Common Clean-Up Mistakes That Make ACoS Worse, Not Better
Not every post-Prime Day PPC action improves ACoS. Several common “clean-up” moves that feel intuitively correct actually create new problems. Here’s what to watch for.
Mistake 1: The Hard Reset
The most common mistake is reverting all bids and budgets to pre-event levels within 24–48 hours. This feels logical — the event is over, so conditions should go back to normal. But as covered above, the organic rank lift from Prime Day is still active, and your ranking signals are still propagating. A hard reset can crater impression share during this window, interrupting the velocity-rank feedback loop at the worst possible time.
The data is clear: a gradual 3–4 week wind-down consistently outperforms hard resets on both ACoS and total revenue in the post-event period. Patience in the first week pays back over the following month.
Mistake 2: Over-Negating
In the rush to reduce ACoS, some sellers add negatives too aggressively — blocking not just confirmed waste but also terms that are borderline or still accumulating data. The result is a dramatic drop in impressions that initially makes ACoS look better (because only the highest-converting remaining traffic is spending), but causes total revenue to fall and organic rank to slip.
Apply negatives with precision, not volume. If you’re unsure about a term, a bid reduction is almost always safer than a negative keyword. You can always come back and negative it later. Recovering from over-negating is harder because you may have broken rank-building traffic that takes weeks to restore.
Mistake 3: Ignoring Sponsored Brands and Sponsored Display
Most post-Prime Day clean-up guides focus almost entirely on Sponsored Products. But if you ran Sponsored Brands (formerly Headline Search Ads) and Sponsored Display campaigns during the event, they carry the same bid-lag problem — and in some cases a worse one, because Sponsored Display campaigns can target audiences and products with extended visibility windows that outlast the event period.
Audit all three ad types. Sponsored Brands campaigns with event-level bids on video and banner placements can generate significant waste in the post-event period if left unaddressed. Sponsored Display retargeting campaigns may be following audiences that engaged during the event but are no longer in a buying mindset — check frequency caps and audience recency settings.
Mistake 4: Not Separating Prime Day Data From Evergreen Reporting
If you use the event-period data (including Prime Day itself) in your 30-day or 60-day performance averages, you’re working with skewed baselines. Your “average” CVR will look artificially high if it includes Prime Day’s conversion spike. Your “average” CPC will look artificially high if it includes the event’s bid inflation. Both distortions lead to bad decisions.
Always filter Prime Day dates out of your evergreen performance analysis and store the event data in a separate labeled pull. Use pre-event data (60–90 days prior, excluding the event) as your true evergreen baseline for setting recovery targets.
Mistake 5: Failing to Capture Post-Event Review Opportunities
This is adjacent to PPC but worth including in a post-event audit: the sales velocity from Prime Day typically generates a wave of reviews and ratings in the 2–4 weeks following the event. Reviews improve organic conversion rate, which in turn improves ACoS (the same ad spend generates more orders). Many sellers focus entirely on the ad side and miss the product page optimization opportunity — updating images, A+ content, and listing copy to capitalize on the increased traffic during the halo period while conversion rates are still elevated.
The 30-Day ACoS Normalization Checklist
Use this as your operational reference for the month following Prime Day. Each item is sequenced based on the optimal timing outlined throughout this guide.
Days 1–2: Immediate Triage
- ☐ Pause or dramatically reduce dedicated event campaigns
- ☐ Reduce all active campaign bids by 15–20%
- ☐ Freeze or override bid automation rules temporarily
- ☐ Reduce TOS placement modifier by 40–50% from event peak
- ☐ Pull Search Term, Campaign Performance, and Placement Reports for Prime Day window
Days 3–7: First-Pass Analysis and Cleanup
- ☐ Segment search terms into four buckets (waste, high-ACoS, harvest candidates, borderline)
- ☐ Add immediate negative keywords for confirmed waste terms (Pass 1)
- ☐ Flag harvest candidates for exact-match promotion
- ☐ Begin monitoring TACoS alongside ACoS
- ☐ Hold budgets at 1.5× normal baseline to protect rank halo
Days 8–14: Harvesting and Structural Work
- ☐ Launch exact-match campaigns with harvested Prime Day winners
- ☐ Negate harvested terms from source auto/broad campaigns
- ☐ Complete second-pass negative keyword review with 7-day post-event data
- ☐ Begin stepping budgets down from 1.5× toward 1.2× normal
- ☐ Assess organic rank on primary keywords and calibrate bid levels accordingly
Days 15–21: Precision Bid Calibration
- ☐ Make campaign-level and keyword-level bid adjustments based on two weeks of post-event data
- ☐ Continue reducing placement modifiers toward normal levels
- ☐ Review first two weeks of performance from new exact-match campaigns
- ☐ Return most campaign budgets to normal baseline
- ☐ Identify structural improvements for evergreen account (cannibalization, ad type gaps, ASIN targeting)
Days 22–30: Normalization and Q3 Setup
- ☐ Fully normalize bids and budgets to evergreen levels
- ☐ Re-engage bid automation with post-event data as the baseline (exclude Prime Day dates)
- ☐ Finalize campaign structural changes
- ☐ Update negative keyword master list with all Prime Day learnings
- ☐ Archive Prime Day campaign data separately from evergreen reporting
- ☐ Set Q3 campaign baseline and begin planning for next promotional event
The Bigger Picture: Why Post-Event Discipline Compounds Over Time
Post-Prime Day PPC clean-up is not glamorous work. It doesn’t involve launching new campaigns or finding exciting new strategies. It’s largely analytical, methodical, and time-consuming in the short term. But the sellers who consistently execute a structured post-event recovery — year after year, event after event — build something that undisciplined competitors never achieve: a compounding advantage in account quality.
Every negative keyword you add from Prime Day data makes your account slightly more efficient for every month that follows. Every exact-match campaign you build from validated Prime Day search terms is cheaper to run and more predictable to manage than the auto campaigns they came from. Every placement modifier reset saves real money in the weeks ahead. The clean-up work has a long tail.
The 56-account data showing post-Prime Day ACoS spiking to 30% represents a real cost — real margin that sellers who don’t act simply give up. The flip side is that sellers who do act, systematically and patiently over 30 days, exit the post-Prime Day window with a tighter account, better data, and a structural edge going into Q3 and Q4.
The clean-up isn’t the end of Prime Day. It’s how you turn a two-day event into three months of compounding returns.