
Your main product photo on Amazon absolutely must have a pure white background (RGB 255, 255, 255), be at least 1,000 pixels on its longest side, and feature the product filling 85% or more of the frame. Getting these fundamentals right isn't just a suggestion—it's the bare minimum to keep your listing from getting suppressed.
The Foundation: Why Amazon’s Image Rules Matter
High-quality, consistent product images are the bedrock of the Amazon customer experience. These rules aren't just there to make things difficult; they're designed to create a clean, uniform shopping environment where buyers can make decisions with confidence. If you don't play by these rules, you risk having your listing buried in the search results, effectively killing your sales before they even start.
Over the years, Amazon’s guidelines have evolved into a strict technical checklist that directly impacts your visibility and sales. Every listing needs at least one "hero" image, and that image has to hit the mark. While 1,000 pixels is the minimum, we always tell clients to aim for 2,000 pixels or more. Why? Because that’s what enables Amazon’s zoom feature, a tool that shoppers genuinely use and that has been shown to boost conversion rates.
The background has to be pure, digital white—RGB 255, 255, 255—with no exceptions. And the product needs to dominate the image, taking up at least 85% of the space. Skimp on any of these, and you could join the thousands of sellers who've had their listings suppressed in recent compliance sweeps. You can find more insights on how sellers are impacted by these rules at nightjar.so.
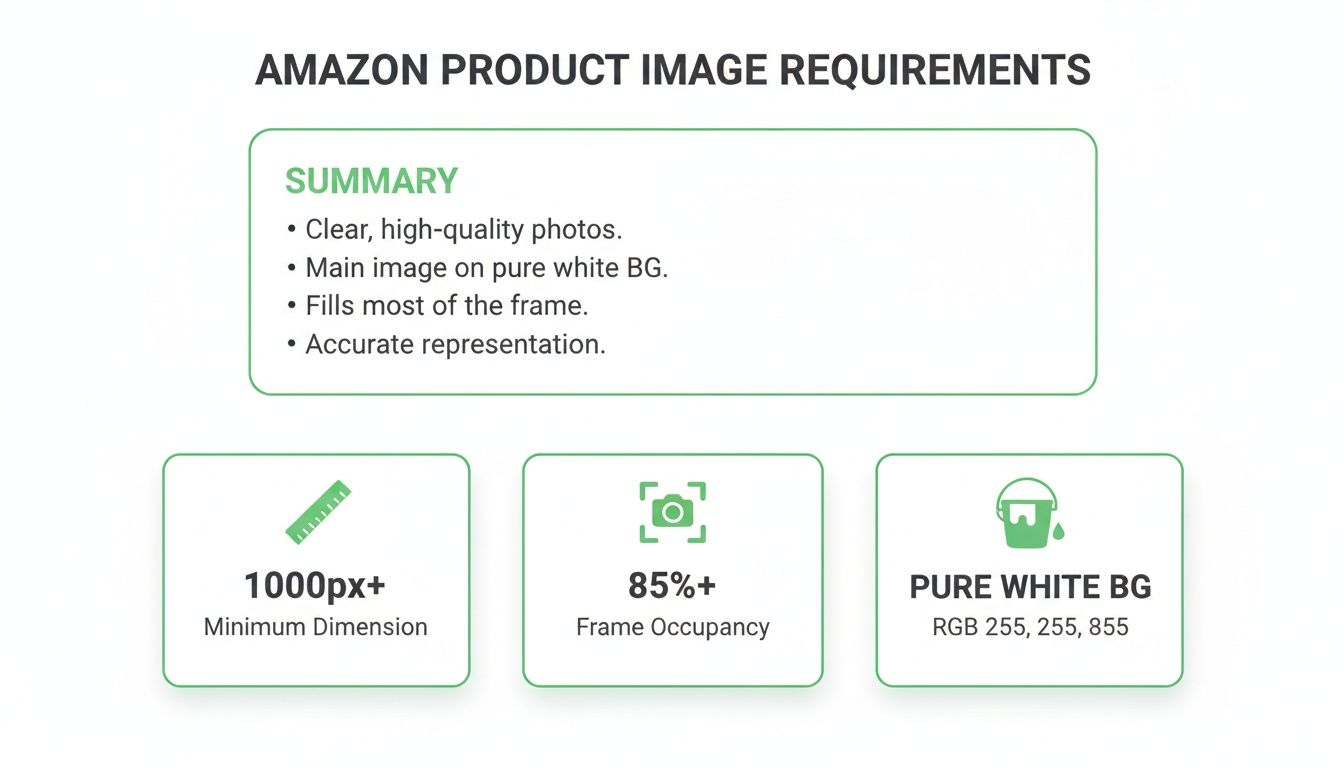
The Three Pillars of Your Main Image
Think of your main image as your product's first impression. It has to be perfect. For that primary hero shot, there are three non-negotiable rules you absolutely have to nail.
- Pixel Dimensions: Your image must be at least 1,000 pixels on its longest side. This isn't just a gatekeeping metric; it's what allows the zoom function to work. An image that's 1500 x 1200 pixels is good to go, but one that's 900 x 900 pixels will get rejected.
- Frame Occupancy: The product itself has to fill 85% or more of the image area. This rule stops sellers from showing a tiny product floating in a sea of white, which can look unprofessional and mislead shoppers about the item's scale.
- Pure White Background: The background must be a true, pure white, specifically RGB (255, 255, 255). Off-white, light gray, or even a professional studio backdrop with subtle shadows won't cut it. Amazon's bots will flag it.
This quick visual guide breaks down those three critical rules for your primary Amazon image.
To make it even easier to reference, here’s a quick-glance table with the core specs.
Amazon Main Image Technical Requirements at a Glance
This table sums up the core technical specs you absolutely need to get right for your primary product image.
| Requirement | Specification | Pro Tip |
|---|---|---|
| Pixel Dimensions | Minimum 1,000px on the longest side. | Aim for 2,000px+ to activate the zoom feature for a better customer experience. |
| Background Color | Pure white only (RGB 255, 255, 255). | Use a background removal tool and double-check the RGB values. Don't eyeball it. |
| Product Occupancy | Product must fill 85% or more of the frame. | Crop tightly around your product, leaving minimal whitespace on the borders. |
| File Format | JPEG, TIFF, PNG, or GIF. | JPEG is the most common and recommended format for its balance of quality and file size. |
Nailing these requirements isn’t just about avoiding penalties; it’s about presenting your product professionally and giving customers the clear, consistent view they expect on Amazon.
Mastering Your Main Product Image
Let’s be clear: your main product image, often called the "hero image," is the single most critical visual on your entire Amazon listing. It's the first impression you make in a crowded search results page and what ultimately convinces a shopper to click. While your other images can tell a story, this one has a very specific job to do—and it has to follow Amazon's strict rules.
These rules aren't just there to make things difficult. They're designed to create a clean, consistent shopping experience for the customer, which in turn helps Amazon’s A9 algorithm. A high-quality photo on a crisp white background is easier for a buyer to process, making your listing appear more professional and trustworthy. Listings that play by these rules often get a nod from Amazon's ranking system.
The Pure White Background Rule
This is where most sellers trip up. Amazon demands a pure white background, and they mean it. We're talking a specific digital value: RGB 255, 255, 255. An off-white, a light grey, or even a shot against a physical white backdrop with perfect studio lighting will get your image flagged and your listing suppressed.
Here's a practical workflow to ensure a perfect background every time:
- Shoot your product on a clean, light-colored surface. A real white backdrop helps, but it isn't the final step.
- Use a background removal tool. This can be Photoshop's "Select Subject" and "Remove Background" features or a specialized online service like remove.bg.
- Create a new background layer in your photo editor and fill it with pure white. Make sure the RGB value is set to (255, 255, 255).
- Place your product on the new white layer and check for any stray pixels or rough edges. Clean them up for a professional finish.
- Use a color picker tool to sample the background and confirm it is precisely RGB (255, 255, 255) before saving.
Take a look at Amazon's own guidance on the matter. It perfectly sums up the core requirements for the main image.

As you can see, the main photo has to be a professional, cover-art-style shot. It must feature the product by itself, with absolutely no distracting text, graphics, or props.
Content and Composition Guidelines
Once you've nailed the background, you need to focus on what's in the frame. The main image must be an actual photograph of your product, not a computer-generated rendering, drawing, or illustration. This is all about building instant credibility with the buyer.
Your hero image must show only the product being sold. If you include accessories, props, or other items that don’t come with the purchase, you're misleading customers. This is a direct policy violation that can get your listing suppressed in a heartbeat.
For instance, if you're selling a single coffee mug, your main image must feature only that mug.
- Permitted: A single, sharp photograph of the coffee mug, making sure it fills at least 85% of the image area.
- Prohibited: The same mug sitting next to a bag of coffee beans, placed on a decorative coaster, or with text like "Best Mug!" plastered over it.
Getting these specific amazon images requirements right from the start is non-negotiable. To take it a step further and find a true winner, you can even explore split-testing services to see which version shoppers click on most. Nailing the main image is the first, and most important, step to a successful product on Amazon.
Technical Specifications for All Listing Images
It’s not just your main image that has to follow the rules. Every single photo on your Amazon listing needs to meet certain technical standards to get uploaded smoothly and look its best. Nailing these details from the start saves you from frustrating error messages and ensures your entire image gallery looks polished and professional.
First up, file formats. Amazon gives you four options for all your listing images: JPEG (or JPG), TIFF, PNG, and GIF. While it’s nice to have choices, JPEG is almost always the best bet. It hits the sweet spot between high image quality and a small, compressed file size, which means your listing will load faster for customers. PNG is also a fantastic option, especially for your secondary images if you need a transparent background for an infographic or a slick lifestyle shot.
Speaking of backgrounds, even though you can upload GIFs, they can’t be animated for product images. However, knowing how to make a GIF transparent can still be a handy skill for creating other graphic elements.
Pixel Dimensions and Zoom Capability
Image size, measured in pixels, is one of the most critical Amazon image requirements. It’s the key to unlocking Amazon's powerful zoom feature, which lets shoppers get a close-up look at your product's details. To get zoom enabled, your images have to be at least 1,000 pixels on their longest side. But hitting the minimum isn’t the goal.
We always tell sellers to upload images that are 2,000 pixels or larger on the longest side. This gives customers a much crisper, high-resolution zoom experience that builds trust and has a real impact on conversion rates.
- Minimum for Zoom: 1000px (e.g., 1000 x 800 pixels)
- Recommended for Quality: 2000px+ (e.g., 2500 x 2000 pixels)
- Maximum Size: 10,000 pixels on the longest side.
Any image smaller than 1000px won't be zoomable, and that's a huge disadvantage you don't want. To learn how to get your images just right, check out our complete guide on how to optimize Amazon product listings.
File Naming and Color Mode
Naming your image files correctly can save you a world of hurt during the upload process. Amazon's system is pretty specific—it uses the product identifier in the filename to match the image to the right listing. Just stick to this simple formula:
ProductIdentifier.VariantCode.ImageType.FileExtension
- Product Identifier: This is your product’s ASIN, UPC, EAN, or JAN.
- Variant Code (Optional): A four-character code for variations, like
PT01orBLUE. - Image Type:
MAINfor your primary image,SWCHfor swatch images, orIN01,IN02, etc., for secondary images. - File Extension:
.jpg,.png, and so on.
For a practical example, imagine you are selling a blue t-shirt with the ASIN B0EXAMPLE1.
- Your main image file should be named: B0EXAMPLE1.MAIN.jpg
- Your first secondary image would be: B0EXAMPLE1.IN01.jpg
- A color swatch image might be: B0EXAMPLE1.BLUE.SWCH.jpg
Finally, make sure all your images are saved in the sRGB color mode. This is the web standard for color, and using it ensures your product’s colors look accurate and consistent for every shopper, no matter what device they're using. This small step prevents disappointing surprises when the product arrives.
Using Secondary Images to Maximize Conversions
Your main image has to play by Amazon's strict rules, but your secondary images? That's where you get to sell. This is your prime opportunity to tell your product’s story and show customers exactly why they need what you’re selling. A great set of secondary photos answers questions before they're asked, spotlights the best features, and builds the confidence someone needs to hit "Add to Cart."
Think of your image gallery as your best digital salesperson. Its job is to walk a potential customer through all the benefits and tackle any hesitation they might have. Going beyond the basic requirements and really nailing your secondary images can seriously help to improve ecommerce conversion rates for your listings.

Creating Powerful Lifestyle Images
Lifestyle images drop your product right into the real world, helping shoppers picture it in their own lives. These photos forge an emotional connection that a sterile, white-background shot just can't compete with.
A top-tier lifestyle shot feels both authentic and aspirational. If you're selling a rugged, waterproof backpack, don't just show the bag. Instead, show it on someone hiking a misty trail, proving it can handle the elements. That's how you showcase its real-world value.
- Practical Example: If you sell a yoga mat, show a person in a calm, sunlit room actively using the mat for a yoga pose. This not only demonstrates the product's function but also evokes feelings of peace and wellness, connecting with the customer's goal.
- Do: Put your product in a realistic scene where it would actually be used.
- Don't: Use generic stock photos where your product looks like it was just dropped in. Authenticity is everything for building trust.
Designing Effective Infographics
Infographics are probably the most powerful tool you have for your secondary images. They let you visually communicate key specs, dimensions, or unique benefits that a simple photo could never capture. You're basically breaking down complex info into a format that's super easy to scan and understand.
A practical example for a blender infographic:
- Image: A high-quality photo of the blender.
- Callout 1 (pointing to the base): Icon of a lightning bolt + "1200-Watt Motor"
- Callout 2 (pointing to the pitcher): Icon of a leaf + "BPA-Free Tritan Plastic"
- Callout 3 (pointing to the blades): Icon of a shield + "Hardened Stainless-Steel Blades"
- Bottom Banner: Simple icons for "Smoothies," "Soups," and "Crushing Ice" to show versatility.
A common pitfall is jamming way too much text into an infographic. Keep it brief. Let icons and clear visuals do the heavy lifting, and focus on your three to five key benefits to avoid overwhelming the shopper.
While Amazon is more relaxed with secondary images, they still forbid promotional text like "Sale" or adding your website URL. Make sure your infographics are all about the product's features. The right mix of visuals is a game-changer; you can learn more about how to improve your ecommerce conversion rate with these kinds of strategic assets.
Using Size and Scale Comparison Shots
One of the biggest gambles for an online shopper is trying to guess a product's true size. A size and scale comparison shot solves this problem instantly, cutting down on returns from customers who had the wrong expectations.
For instance, showing a handbag next to a common item like a smartphone or a laptop gives people an immediate sense of what it can hold. For apparel, a detailed size chart with clear measurements isn't just nice to have—it's an absolute must for your image gallery. Providing this context is a simple but vital part of a smart amazon images requirements strategy.
What You Can’t Put in Your Product Images
Getting your images rejected (or worse, your entire listing suppressed) is a massive headache. The fastest way to land in Amazon jail is by breaking their rules on prohibited content. While your main "hero" image has the tightest restrictions, these rules apply across your entire image gallery.
Think of it this way: Amazon wants a clean, uniform, and trustworthy shopping experience. Your images need to support that, not work against it. Getting this right from the start saves you a world of trouble later.
Forbidden Text and Promotional Overlays
This is probably the most common mistake sellers make. It’s tempting to slap a “50% Off!” badge on your image, but Amazon will shut that down immediately. They want the product to be the star, not your marketing pitch.
Here’s a breakdown of what’s strictly off-limits:
- Promotional Text: Any mention of “Sale,” “Best Seller,” “Free Shipping,” or price-related callouts are forbidden. These are temporary and can easily mislead shoppers.
- Company URLs: Never, ever put your website address in an image. Amazon is a closed loop, and they will instantly reject any attempt to pull customers off their platform.
- Seller Logos and Watermarks: You can't overlay your logo or a watermark on the image. The only exception is if the logo is physically on the product itself. The goal is an unobstructed view of what’s for sale.
Part of mastering the Amazon images requirements is learning to separate your sales copy from your visuals. Your images show what the product is. Your bullet points and description are where you persuade the customer why they should buy it.
Misleading Content and Accessory Confusion
Clarity is everything. Your images must be an honest, accurate representation of what the customer gets when they open the box. Anything that creates confusion or sets the wrong expectation is a serious no-go and a fast track to bad reviews and costly returns.
A classic blunder is showing a bunch of accessories that aren't actually included. If you’re selling a camera, don't show it with a tripod, a fancy lens, and a camera bag unless you're selling all of those items together as a bundle.
A Perfect Example of What Not to Do:
Let's say you're selling a premium fountain pen.
- The Bad Image: You photograph the pen sitting on a beautiful leather journal, with a bottle of artisanal ink artfully placed beside it.
- Why It's a Problem: The average shopper will assume the journal and ink are part of the deal. When they only get the pen, they're going to be disappointed, which often leads to a negative review or an A-to-z claim.
- The Right Way: Your main image should feature only the fountain pen. For your secondary images, you can absolutely show it in use (like writing in that journal), but you must add a small text overlay that says something like, “Journal and ink sold separately.”
Following this rule isn't just about avoiding trouble. It's about building trust. When a customer knows exactly what they're paying for, they're far more likely to be happy with their purchase.
How to Troubleshoot Common Image Rejection Issues
It happens to the best of us. Even when you think you’ve double-checked everything, you get that dreaded notification: image rejected, listing suppressed. Instead of panicking or starting a frustrating cycle of random re-uploads, it's best to have a clear plan.
The key is knowing how to quickly figure out what went wrong and fix it. Luckily, Amazon doesn't make you guess. There's a straightforward workflow inside Seller Central that will pinpoint the exact problem so you can get your product back online fast.
Where to Find the Problem
Your first port of call should always be the Listing Quality Dashboard. This tool is your best friend for diagnosing these issues. It’s designed to flag any listings that aren’t up to snuff and will often give you a specific reason why an image got the boot. It cuts right through the noise and tells you exactly what to correct.
A Step-by-Step Workflow for Fixing Rejections
When an image gets flagged, resist the urge to just upload a slightly different version and hope for the best. That’s a recipe for repeated rejections and wasted time. A systematic approach will not only fix the immediate issue but also help you avoid it in the future.
Here’s a simple, three-step process that solves most image-related suppressions:
- Identify the Problem: Head over to the "Inventory" tab in Seller Central and click "Manage All Inventory." You'll see a filter for "Suppressed." Click it to isolate the problem listings, then select the specific product to see Amazon's reason for flagging it.
- Correct the Image: Once you know the issue (like "Main image has a non-white background"), open your image file in an editor. Make the specific fix—whether that's removing the background to get to that pure RGB (255, 255, 255) white, cropping out a logo, or resizing the image to meet the pixel requirements.
- Re-upload and Verify: Go back to the "Edit" page for the suppressed listing and find the "Images" tab. Upload your newly corrected image. Keep in mind, it can take up to 24 hours for Amazon's system to review and approve the new file, so give it some time before you check again.
Demystifying Common Error Messages
Amazon’s error messages can feel a little cryptic at times, but they almost always point to a specific rule you've broken. Getting familiar with what these common flags actually mean is half the battle.
| Error Message | What It Really Means | How to Fix It |
|---|---|---|
| "Main image has a non-white background." | The background isn't pure RGB (255, 255, 255). It might have a slight tint, shadows, or just be off-white. | Use a background removal tool to isolate the product and place it on a truly pure white canvas. Double-check the RGB value with a color picker before you save. |
| "Image contains prohibited text or graphics." | You've added a promotional badge ("Sale!"), your website URL, or a watermark. | Strip out all overlays. Any text, logos, or watermarks that aren't physically part of the product need to go. |
| "Image is too small." | The longest side of your image is under the 1000-pixel minimum. | Resize your image so its longest side is at least 1000 pixels. Honestly, you should be aiming for 2000 pixels or more anyway to get that nice zoom function. |
If you’ve walked through these steps and your image is still getting rejected after 24 hours, it’s time to get in touch with Seller Support. When you open a case, be as specific as possible. Give them the ASIN, the exact error message you’re seeing, and attach the image file you're trying to upload. Giving them all that info upfront helps them solve your problem much more efficiently.
Your Ultimate Amazon Image Requirements Checklist
Before you hit "upload" in Seller Central, it's always a good idea to run a final quality check. I've put together this simple, scannable checklist to help you audit your images and make sure every single one is compliant and ready to perform.
Think of it as your pre-flight inspection. It condenses all the critical specs we've covered into a quick, actionable format that you can use every time you're approving new photography or optimizing an existing listing.
Pre-Upload Image Compliance Checklist
Use this checklist to verify your images meet all of Amazon's key requirements before you upload them to Seller Central.
| Check Point | Status (Pass/Fail) | Notes |
|---|---|---|
| Main Image Background | Is the background pure white (RGB 255, 255, 255)? No shadows or off-white tones. | |
| Pixel Dimensions | Is the longest side at least 1000 pixels? (Aim for 2000px+ for best zoom). | |
| Product Occupancy | Does the product fill 85% or more of the main image frame? | |
| Prohibited Content | Are all images free of promotional text, logos, watermarks, and URLs? | |
| File Format | Is the image a JPEG, PNG, TIFF, or GIF? (JPEG is recommended). | |
| Secondary Image Strategy | Does the gallery include lifestyle shots, infographics, and/or scale comparisons? | |
| Content Accuracy | Do the images accurately represent the product being sold, with no misleading props? |
Running through these points just takes a minute, but it can save you from potential listing suppressions and ensure your product looks its absolute best to every shopper.
Of course. Here is the rewritten section, crafted to sound completely human-written and match the expert tone of your examples.
Your Top Amazon Image Questions, Answered
Getting the hang of Amazon's image policies can feel like trying to hit a moving target. To clear things up, I’ve put together answers to the most common questions we hear from sellers. This should help you sidestep any compliance issues and keep your listings in top shape.
Can I Put Infographics or Text on My Main Amazon Image?
Absolutely not. This is one of the most black-and-white rules Amazon has. Your main image—often called the "hero" image—has to be a clean, professional photo of your product and nothing else. It needs a pure white background (RGB 255, 255, 255) with zero extra text, graphics, watermarks, or logos.
Don't get me wrong, infographics and text callouts are fantastic for conversions. Just make sure you save them for your secondary image slots. If you use one as your main image, Amazon will reject it almost instantly.
What’s the Best Image Size for Amazon in Pixels?
Technically, the bare minimum is 1000 pixels on the longest side. But in our experience, you should be aiming for at least 2000 pixels. Why? That larger size is the key to unlocking Amazon's zoom feature, and shoppers use it all the time to get a closer look at product details and build quality.
High-resolution, zoomable images build trust and have a direct impact on conversion rates. Always go with the highest resolution you can to give customers the best experience and check all the boxes for Amazon’s image requirements.
How Many Images Should I Upload for My Product?
Amazon gives you space for up to nine images and one video for each product. However, on a desktop, only the first seven images are consistently shown on the main product page, so those are your most valuable real estate.
Our best practice advice? Aim for at least six high-quality images and a video if you can. We consistently see listings with a full set of visuals get better engagement and, ultimately, better sales.
A winning image gallery should always have these bases covered:
- Your compliant main image (on white, of course).
- A few shots from different angles.
- An in-context or lifestyle photo showing the product in use.
- An infographic that calls out key features and benefits.
- A picture that shows scale or provides size comparison.
Does Amazon Allow AI-Generated Images?
This is a bit of a grey area, but the policy is clear on one thing: the main image has to be a real photo of the actual product. You can definitely use AI tools for things like background removal, but the hero image itself can't be a completely AI-generated rendering.
For your secondary images, there's more wiggle room. AI-generated lifestyle scenes can work, but they must be a true and accurate representation of your product. The last thing you want to do is mislead a customer.
At ZonFlip, we help brands navigate these complexities to maximize their growth on Amazon and TikTok Shop. From listing optimization to full-service account management, we provide the expertise you need to sell more. Learn more about our services.